
4 Ways to Create a Minimalist Bathroom
Minimalism has become one of the most popular home design trends in recent years. And it is not hard to see why. In a life that is increasingly cluttered, creating a living space that is clean and relaxing is becoming more appealing to more and more people. Being a minimalist doesn’t have to cost much, it is simply a mindset as we showed in my post on ‘5 Tips on Spring Cleaning With Minimalism in Mind’. That being said there are changes that you can make to a room from simple adjustments to more expensive renovations that will create the perfect minimalist space. In this post we will focus on revamping the room that is used the most and also gets cluttered the easiest. The bathroom.
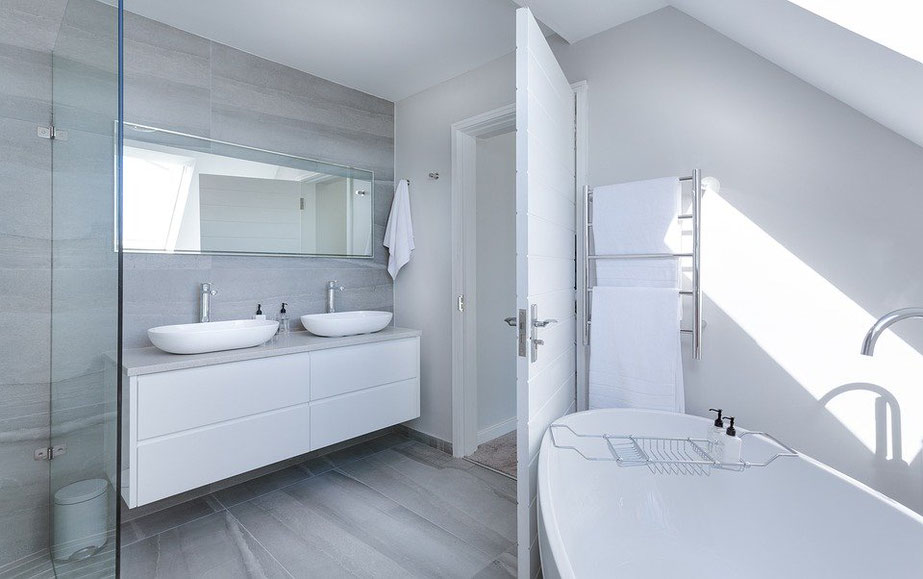
Yes, I can not wait to share this sponsored post written by Oscar King with you! When I was asked to check out and share the following links and websites as well as design ideas, I was so excited because I knew that you would love it! And it could not have come to a better time as I call for spring to come soon and our bathroom needs new paint.
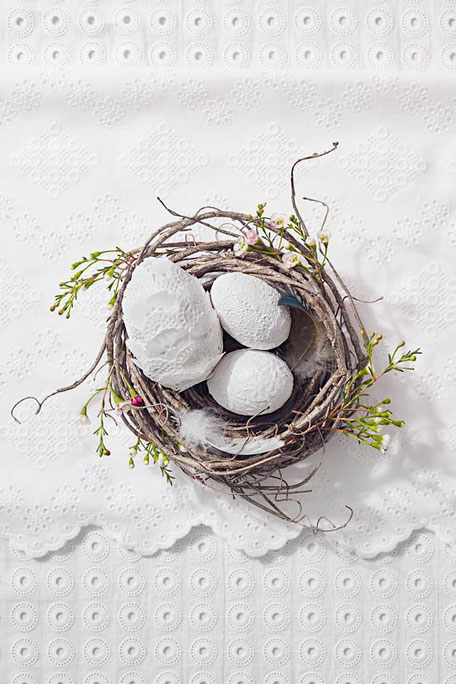
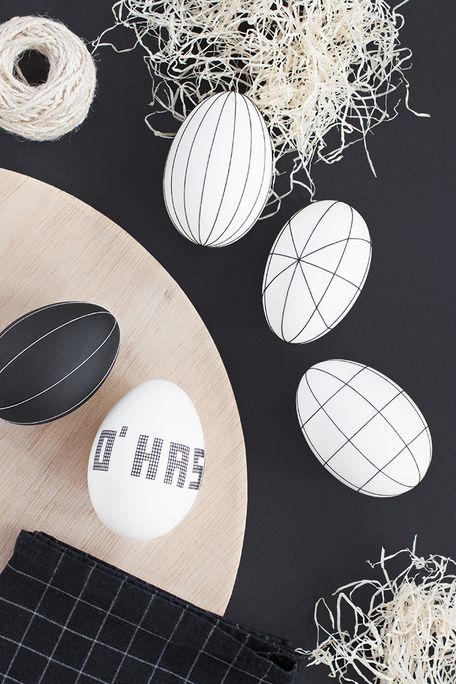
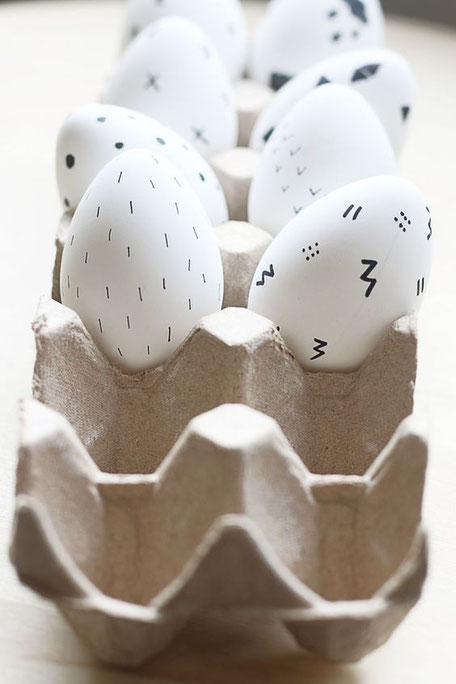
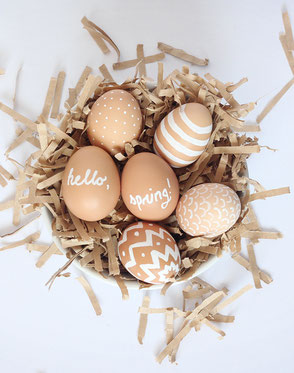
3 Monochrome DIY Easter Egg Decorating Ideas
The Easter holidays are about a month away but if you are as busy as I am you will need a bit of time for planning and doing.
I have found 3 intriguing monochrome Easter egg decorating DIY ideas for us. Especially if you are not one for big gifts at this time of the year, a little bit of crafting and a nice table setting will make the difference. Let's get in the mood for Easter!
The first idea is by Martha Stewart believe it or not. [source]
Paper doilies are being used to decorate the eggs in a minimal but elegant romantic maybe even farmhouse style of way. In this case - the one to the right - with white doilies but of course you can get black or golden ones as well or paint them with water colours yourself for even more uniqueness. I am pretty sure everyone will think these are too pretty to play with.
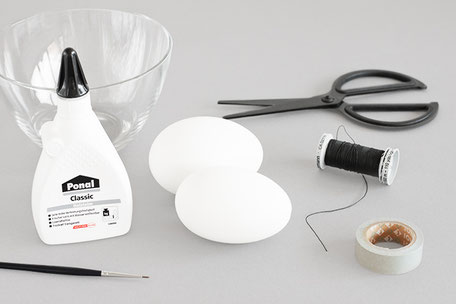
The second idea is via a German blog called BildSchoenes but even though it is written in German the images are pretty self-explanatory. Anyhow, not to worry, I am going to sum it up for us. Besides time and patience you will need firstly some blown-out eggs and some strong / thick thread. [source]
Additionally, scissors, glue and tape to fix the thread to begin with.
Just a little tip, in this DIY goose eggs are being used as they are a bit larger. Have a look below, left is the result and right are the big steps to start ....
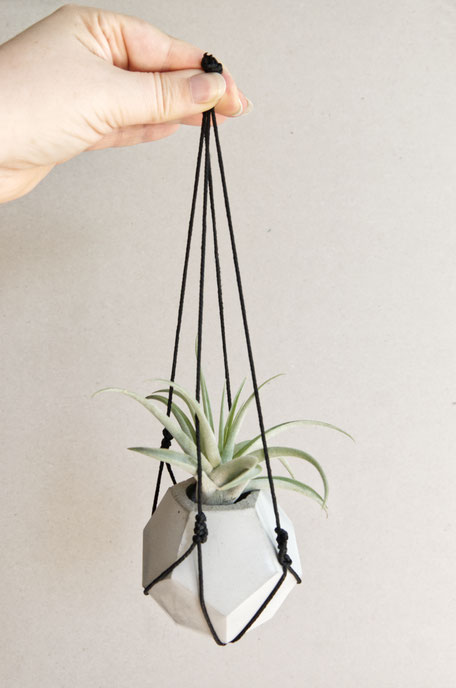
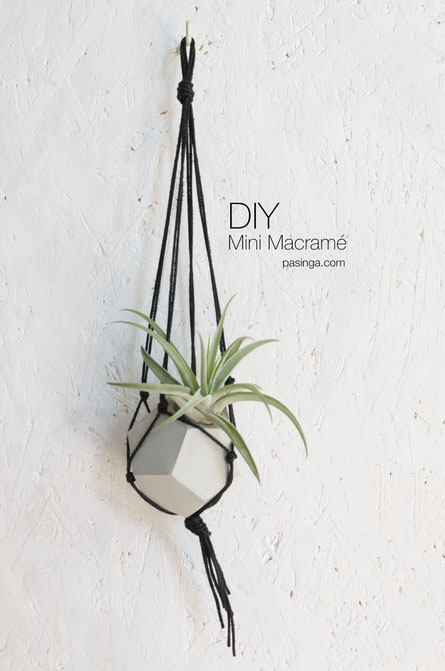
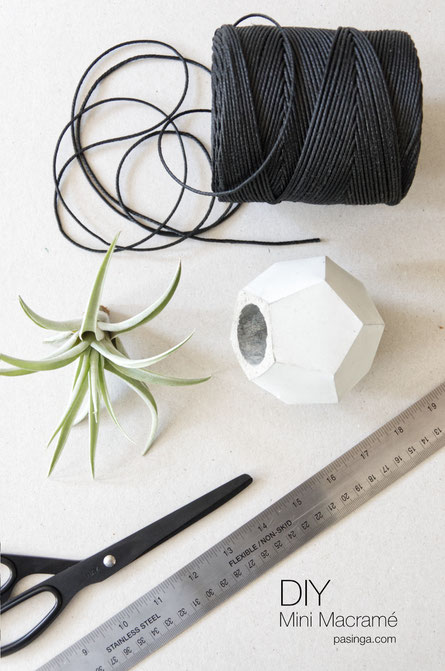
How To: DIY Macramé To Hang Your Geometric Concrete Planter
I used the same things like last time as I thought you either purchased some of the things you need or have them already. In any case I did not want to cause waste. So get your ruler, scissors, your vessel and plant, and of course string, twine or ribbon you wish to use.
My vessels, I used this netting for are both, are about 10cm tall and the plant, Air Plant Capitata Peach, adds another 10cm. To measure the string length I went for 4 times the length.
After my last DIY Macramé to hang your geometric concrete vessel I received so much amazing feedback - thank you! and a lovely comment requesting one without the tassel. You are absolutely right, the tassel is an additional eye-catcher which could take away from the geometric vessel or plant. It took me a moment to find a way but here we go ...


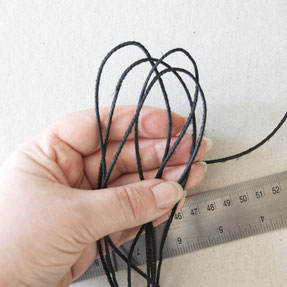
Altogether you need 4 strings no looping [the other macramé can you find here] this time. So we are working with 4 strings each at least 60cm but not more than 80cm long each.

Take four endings and knot them together tightly by pulling each string ending individually until the knot stops going tighter. If you use a nylon string you could use a lighter to melt the endings together neatly above/ into the knot. Tip, use the metal ruler to flatten the molten ending.
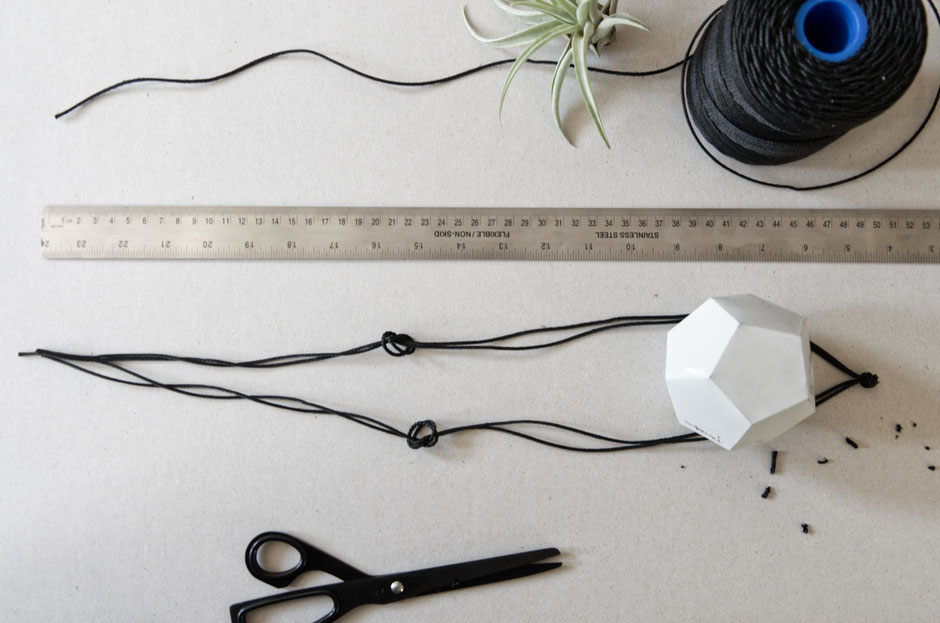
Now, use your vessel and place it with space around it in front of you. Part the four strings and lay it around your vessel. There should be two strings to each side which you start knotting together. The height for the first row of knots will depend on the height of your vessel. Mine is 10cm plus plant height so I went for something above 25cm for my first netting nots measured from the string endings.
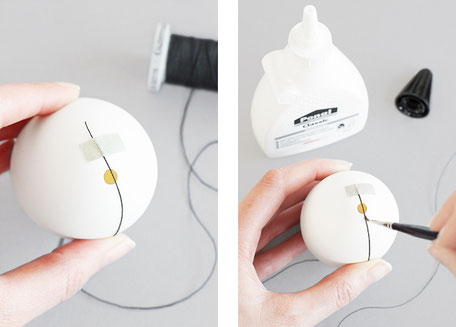
How To: DIY Tassel Macramé Plant Hanger
As you can see on the right all you needs is some twine or string. Of course there is proper macramé string available but you can use any string you have on hand for this design. Your vessel and plant, ruler and scissors.
My vessel is about 10cm tall and the plant adds another 10cm. To measure the string length I went for 3 times the length.
Macramé hanging planters are everywhere and why not?!? They are beauties, space saving while giving a delightful happiness to the place where they have been hung. So while organising my own display I decided why not give it a try but of course not without showing you how I did my mini tassel Macramé variation.
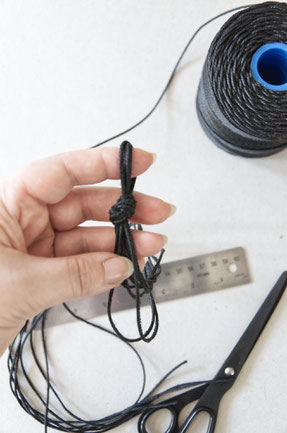
Altogether you need 4 strings looped to 8 endings. Which gives you 8 strings, not all cut, each 60cm long or 4 strings each 120cm long before folding it to half the length of 60cm.
Now take the looped string ends and knot them together. Try to keep a finger or a pen in the loop to make an even knot. After the knot is in place fasten it by pulling on the strings one by one.
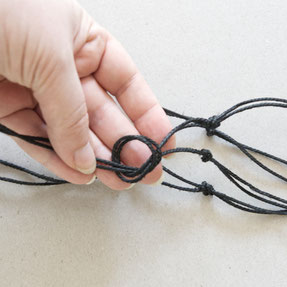
From there we will use simple knots as shown above to knot two strings each time.
How To Make This Modern Garden Flower Wreath
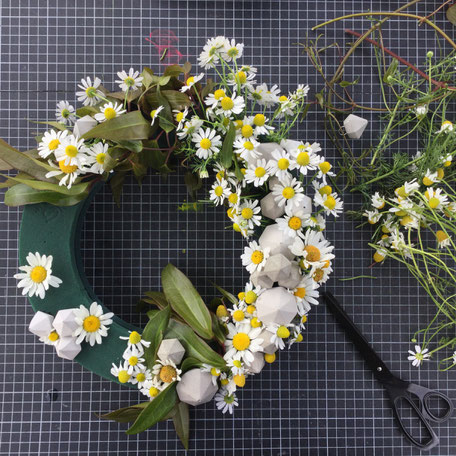
Let's bring a bit of summer inside with a fresh and bright garden flower wreath design. After all a modern wreath can be a wonderful decor accent all year around.
So what do we need for this summer blossom dream?
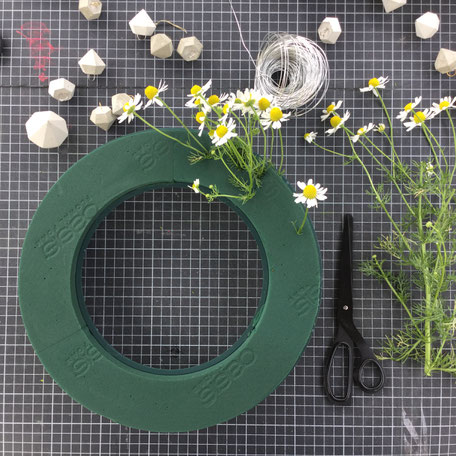
A plug foam ring in your preferred size but I have chosen one with an outer diameter of 30cm.
I am using my favourite flowers and herbs as well as some simple long leaves. So there are three types of flowers for me but if you have more to choose from go wild and bring your whole summer meadow into this wreath. For me it is about 5 camomile stalks, 10 daisy stalks and 10 long big leaves. I have no idea what they are called but I like them and they have been here since before we moved in.
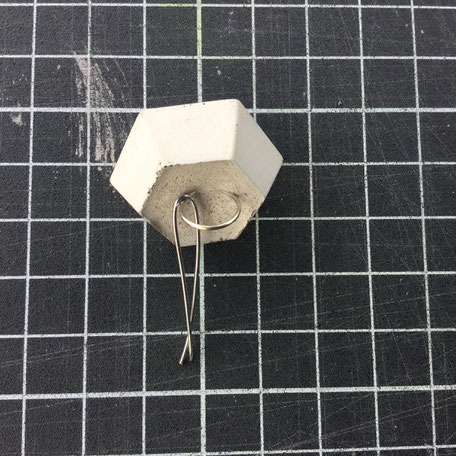
Anyhow, this is of course just an estimate and if your flower heads are bigger of course you will need less. Additionally, as you know, I can't do without a bit of a modern geometric edge so I used the concrete diamond ornaments and extra wire.
I started with watering the ring by having it soak up water in my sink. Since I just read it, do not push it under water but rather lay it on top and wait for it to soak the water in. So I am guessing by now you know, first timer ;D
Took about 20 minutes but I made use of the time by cutting and sorting my flowers. I also prepared some additional wire for a stronger fix of the concrete ornaments within the wreath.
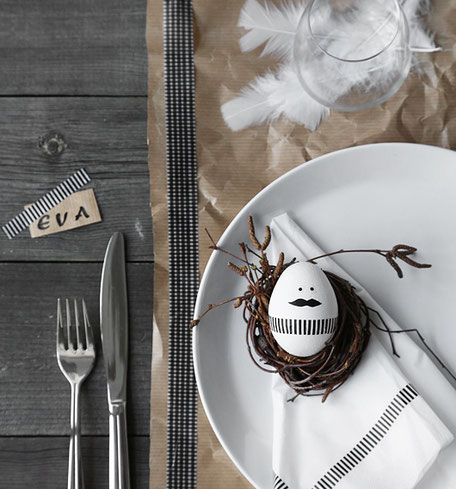
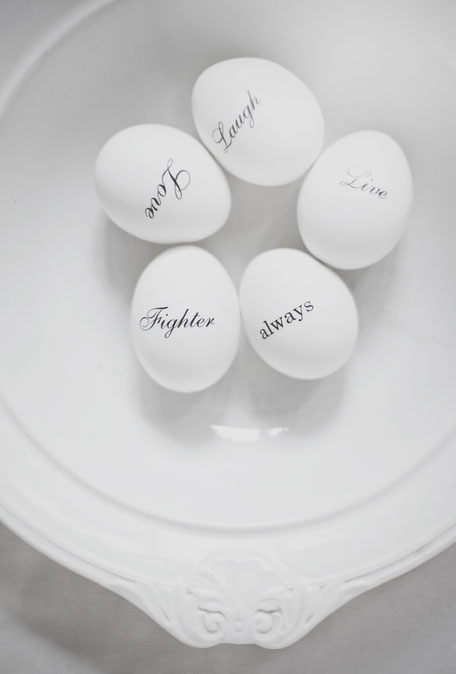
10 Happy Easter Last Minute Decoration Ideas
Last working day of this marvellous week is here and bank holidays are ahead. Well, I know how time has a habit of running and so I will be sharing some Scandinavian inspired, minimal modern last minute Easter decor ideas you can do without huge fuss or prep. Well, even though I shared some Easter table settings this year too, I am pretty sure one can never be too inspired and even though if you might have your heart set on a design maybe these little accents are nice to add. I collected these ideas with my Pinterest and of course all are linked back to where I found them.
Little notes and thoughts are in between but I will allow the images to speak ....

Some classic Easter decor ideas with a modern twist are below. To the right are the blown out egg shells simply hung on a branch and to the left these beautiful eggs are painted with a marker pen....

I think both egg display ideas - above and to the left - work fabulously with the concrete hay Easter nest should you have made it ;D

And last but not least some attractive alternative Easter decor ideas. Mix it up with flowers, hang or display your branch differently, add modern typography or names to your eggs on display, use twigs or create paper feathers....


... I think that's a wrap, all I fell in love with this Easter. Don't forget the Easter nest DIY I posted a couple of weeks back - it could just be the crafty family fun for you!
In any case, happy Easter and a wonderful time,
best Antje
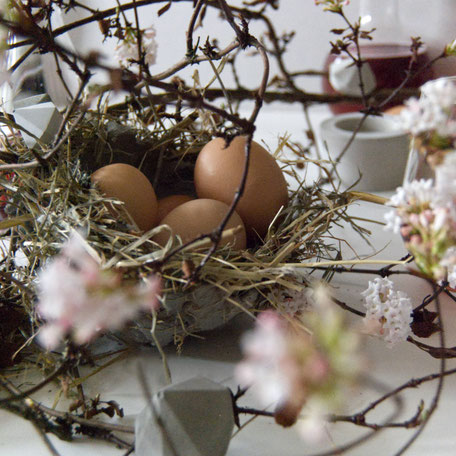
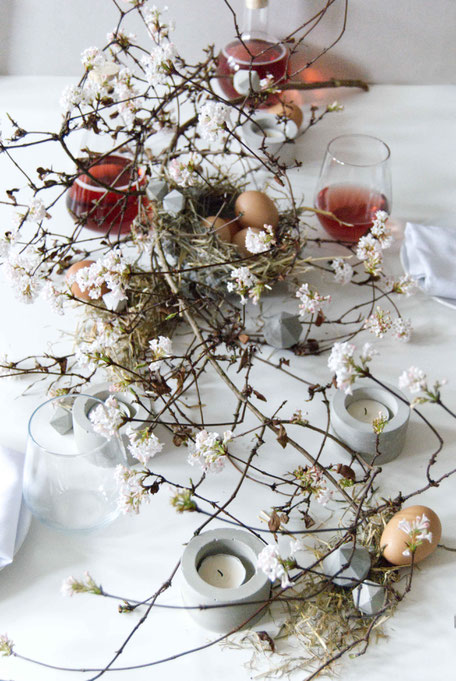
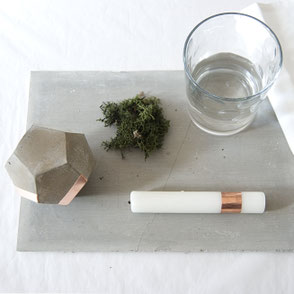
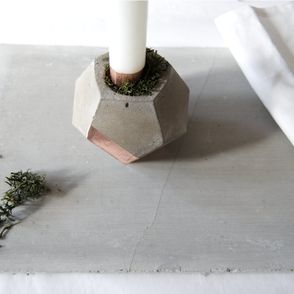
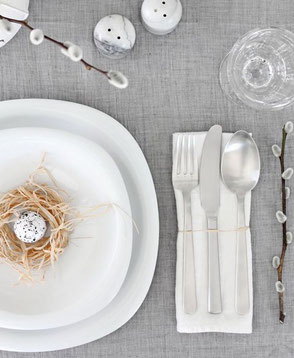
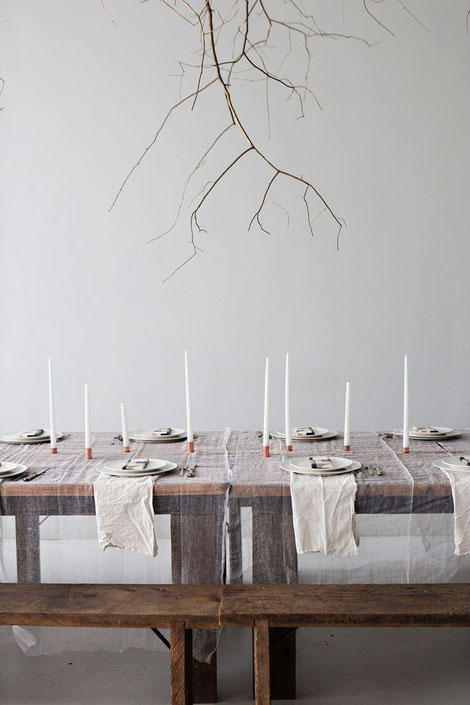
A Spring Pastel Easter Table Setting With DIY Concrete Accent
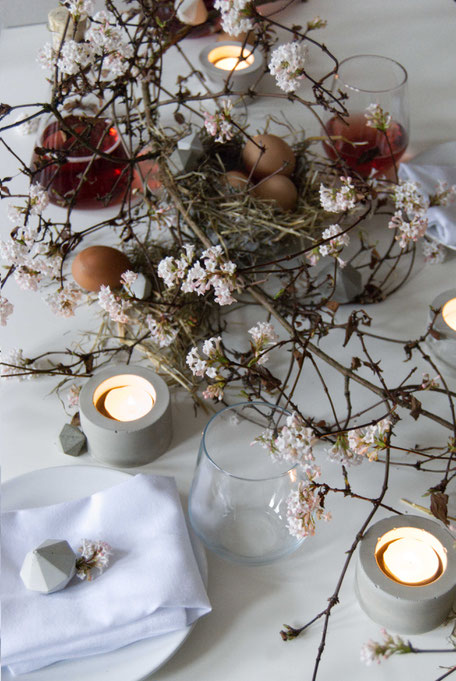
It certainly feels like spring outside. The first soft pastel blossoms are around and I am getting all excited about Easter this year. I am not usually the one to do so but this years Easter nest DIY got me decorating all over the place. In many ways the whole table centrepiece started with the concrete hay nest - full fun instructions are here - and evolved to adding branches, eggs, candle holders, diamond ornaments, hay and party favours. Since our table is white I went for a clean setting without tablecloth, however white linen napkins add a useful soft touch. I am pleased with the soft almost fragile modern feel considering that rather hard objects, made from concrete, are centre stage. It feels very laid back and raw not to say minimal by all playfulness. There is enough space around the table to add further bowls and trays to complete the - for us it will be the - brunch table which I feel everything will fit perfectly to the centre piece.
Anyhow below are more details to appreciate - including a variation I am delighted with too but lets have a closer look!

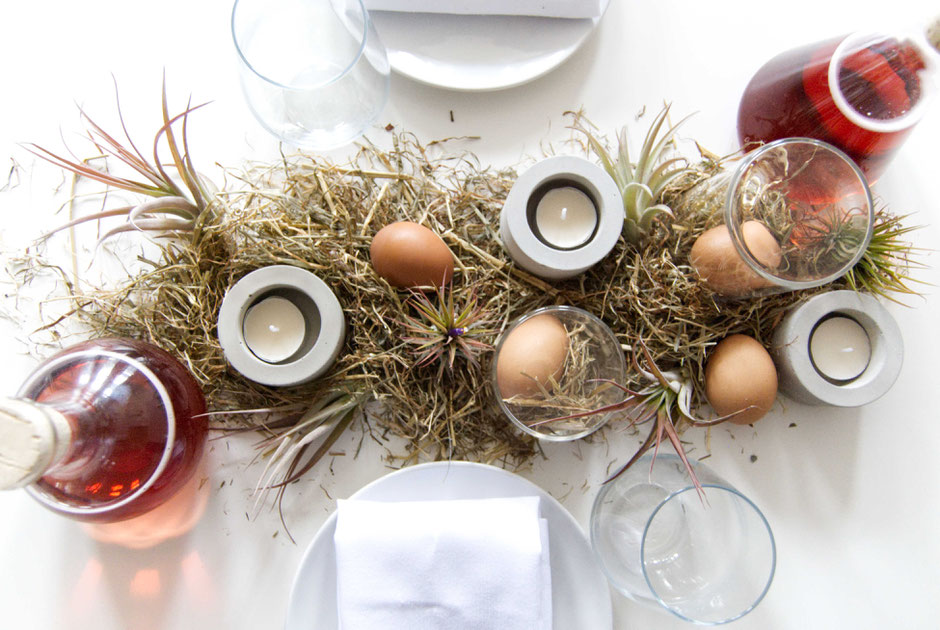
The nest which is the one formed over the balloon is to me the one which fits best to the overall decor idea and it works well with the branch. I added 4 eggs, which can of course be eaten but also to highlight the fun eye-catcher even more. After all I and maybe you too crafted this piece as well!
I left enough space for a bread basket and two platters with food goodies, several glass jars of preservatives and so on. I think these breakfast and brunch goods will work quite well with the colours of the centrepiece.

All around the branch I chose areas where I placed a bit more hay but you could also place smaller or other nests if you have crafted more. I placed diamond ornaments in different sizes all around the table on top of the hay as well as the branch. All concrete is pale grey which works fabulously with he natural tones of the hay and the branch and adds just the softest of contrast to the pastel rose blossoms. The candle holders are rather minimal and bold but I was thinking of all the hay and decided these would work best after all I don't want a fireplace. But candle sticks could work wonderful too.

I found it hard to decide which plate setting to choose. One is providing a little gift for the guests and who doesn't like to keep a little diamond as keepsake like above. The other is cute and fits Easter perfectly by gifting a simple egg. Both however would allow to add the name of the person to be seated should it be something you desire. Well, it's up to you now!
5 Tips On Spring Cleaning With Minimalism In Mind
Based on the meteorological calendar Spring is here and I feel a bit of Spring cleaning with minimalism in mind could just be the thing. I personally can't decide between Spring and Autumn, I love them both, the life in the changes, the colours and light at those times. Anyway, I think it is the change which is giving me energy and inspiration to move and change as well. It is not that I think I own clutter or would ever have a problem with throwing stuff out, nope not me, I always feel refreshed after a good old clean and clear. Maybe, I am still too German, haha.
Recently however, I feel the urge to slow down and to be a bit more consequent, by which I mean, not just have a bit of a clear out of unused things two times a year but change things so that this would not be needed anymore. So how to start this, how to change things.
I found loads of guides some 30 or 50 steps long, even a minimalism challenge was among them. Has anyone done one of those? Well, it is all too much for me, one could say not very minimal, pun intended. So I decided, I will choose 5 things I find useful and easy to incorporate into my routines.


First
Simplify my home by giving everything its space. I will only keep things I need [used within the last 3 months or so] or absolutely love and treasure.
Second
Clear out my wardrobe, not much there really but I tend to hang on to stuff I don't wear as I dread cloth shopping. So my goal is to only have those pieces which I really wear.
Third
Get rid of devices, best in a box or all in one place and switch them off at least one day of the week. I love this one, it was not in many guides but I think it will not only help me to be more minimalist but also to slow down and breathe.
Fourth
This is a truly tough one for me but here goes nothing - simplify my calendar! Oi, that is something, every mum, small biz owner .... will know, even worse when having a creative life. Nothing is truly going by calendar but I honestly will try to get the business side, the side I actually should be able to plan, done by a reasonable calendar and who knows maybe I am going to manage even more ;)
Fifth
Restore and cut back on waste - now I have to admit that this is not a new thing to me but I want to get more serious about it. Not just in my lifestyle but also with my art and craft. I recycle already as we do all and 90% of my packaging is done with recycled materials but I could start a garden bin, grow some herbs and look into low Co2 concrete and recycled concrete .... I am sure with time I will find even more and I am grateful for tips as well!
Six Weeks Until Easter! Modern yet rustic table decor inspiration
There is no rush or anything but I just found it so fitting to have a first exciting tease for easter on my blog today. After all it is already the last day of February and Easter is in about 6, well if you don't celebrate or decorate for the week, 7 weeks. I just think it is the right opportunity to start decorating and styling and charge the creative batteries for the Easter festivities ahead with happy bunny mood, haha!
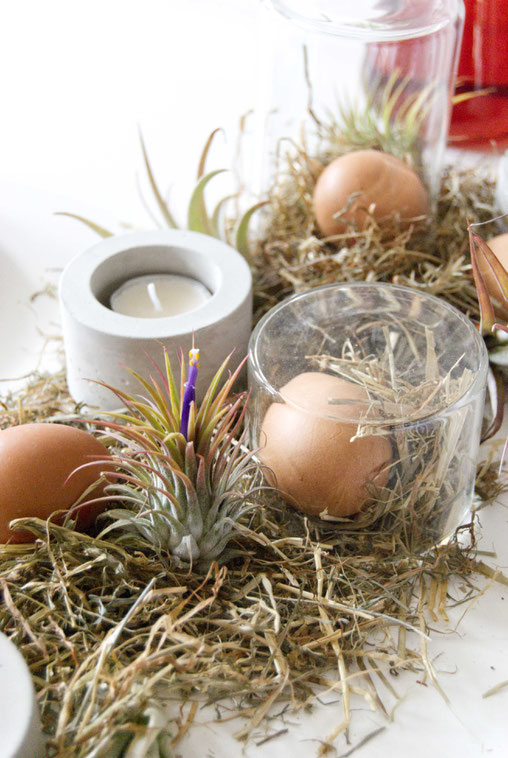
Well what did I use? As you can see I could not stop myself but got a bit of 'bunny' hay and straw mix. Of course some eggs, my concrete cylinder candle holders, a mix of Multiflora and Rubra Air Plants and some glasses. I was thinking of just a small table for two but of course you can just add more to fill a larger centre or stage the table more generously. Overall I wanted something modern yet somehow rustic, you know close to nature and so on...


Winter Wreath Decorating Tutorial

December is here and I am decorating my studio with little bits of green to surround me with some festive mood and coziness.
To me Winter, and maybe Christmas, warmth comes from a bit of of evergreens, pine cones, moss and candles but also from a bit of crafting just for myself. So here we go, a wreath DIY to get the spirits up. I promise these two are fairly easy and you can incorporate almost anything you are pleased with or cherish the most.
Materials and tools ...
I am using copper coil which I bend over a bucket, about 30cm in diameter, to have a wonderful circular shape for the first one. However, you could also use a wooden loop, a proper wreath ring available in a lot of sizes.
In contrast I am going to use the concrete cube ornament set, some greens and simple dark green evergreens. You will also need some scissors, twine or threat, alternatively some wire, and a gardening scissors to trim the greens.
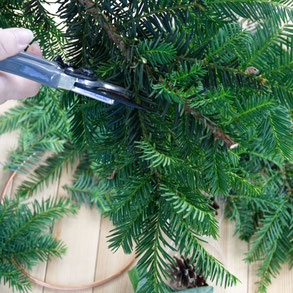
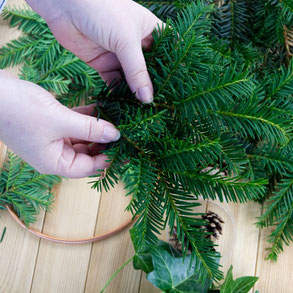
Just like the pictures on the left show, I am cutting off some smaller, softer twigs, preferably with beautiful fork like tips of the branch. I place them in bundles on top as well as closely next to each other to create volume and attach it to the wreath as shown below.
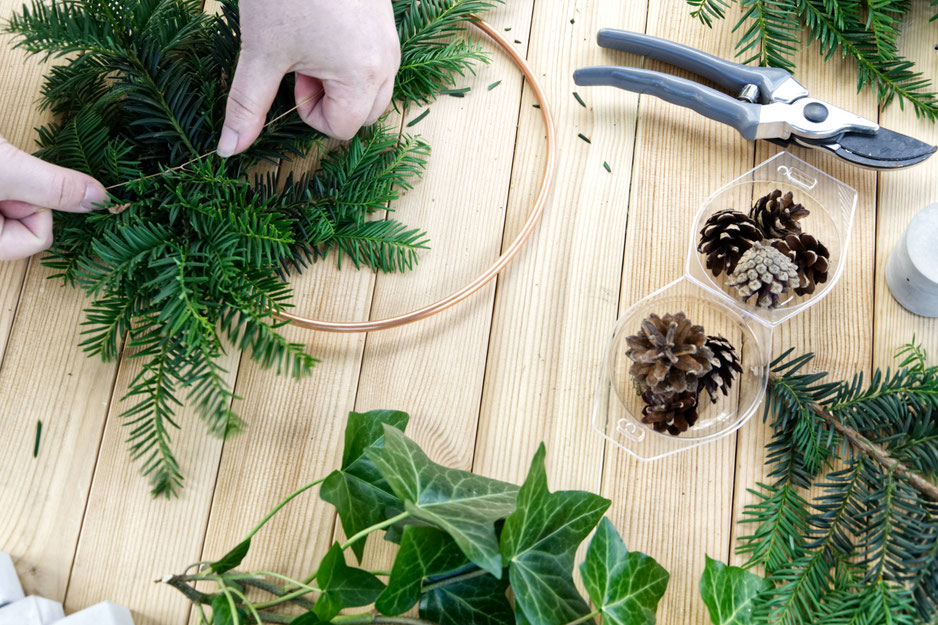
I am using copper coloured nylon threat. I find this more flexible compared to wire and easy to handle. You can attach the green first and cut the threat but I use a long threat on purpose as I will use it to attach some ornaments as well. So I took my bundled greens and placed them to the [when hung] lower side of the ring and knotted the greens to the copper ring.
Wonderful Warm, Geometric And Eco-friendly Christmas Gift Wrapping Ideas

Is there anything more exciting than wrapping a gift in anticipation of happy smiles and bright eyes, warm hugs and wonderful memories? Nothing right?!
This year is especially exciting to me as my new concrete ornament series is available and new gift wrapping designs can be
created but also because of the ever growing Furoshiki trend [where you use reusable fabric to wrap your amazing gifts]. So I decided all the presents for the adults will be gift wrapped in linen
scarfs and kitchen towels - haha guess who gets which?! Right, men have to help with the dishes!
However, for my nieces and nephews I will stick to recycled paper so that they can rip it apart and enjoy that moment to the fullest.
I am not sure about you but once I had that sorted I felt drawn to a bit of foliage this year. Last year I was more minimalist with just tags and cards but this year a bit of warmth is required and I think a bit of fir and other evergreens could just do the trick. Instead of having cards this year I will just write the names on the present or concrete gift tag, got my gold and silver paint pens ready already! Let's see - above and below are some ideas I came up with during my photoshoot but there are also some additional ones I feel heavily inspired by.
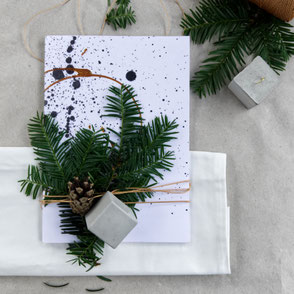
Some things don't need extra wrapping, they are just too pretty and so I decided some nice twine, evergreen, a pine cone and a geometric concrete pendant is just about right to let it shine even more and give it that personal touch.
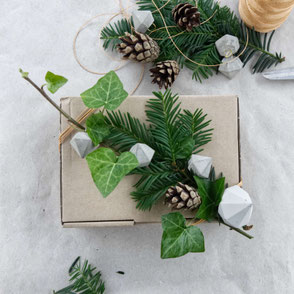
Diamonds are always a good idea or so they say, do I need to say more?!?
And to the right - a minimal almost masculine way to wrap a present - recycled grey paper, dark baker twine and hexagon ornaments.


Up-cycling a bit of newspaper or magazines can add such a wonderful warm twist, cherry on top, or so it feels, is this wonderful ripped fabric ribbon. More ideas are on my Pinterest wrapping board and more details and a picture guide to Furoshiki for beginners is on my blog but doesn't this just look stunning, even though it is just an ever so simple knot. Oh I am getting excited - I think my wrapping is sorted, not all the gifts though even though all the designer makers of my little Christmas gift guide series over here have been very helpful - have a click for inspiration!
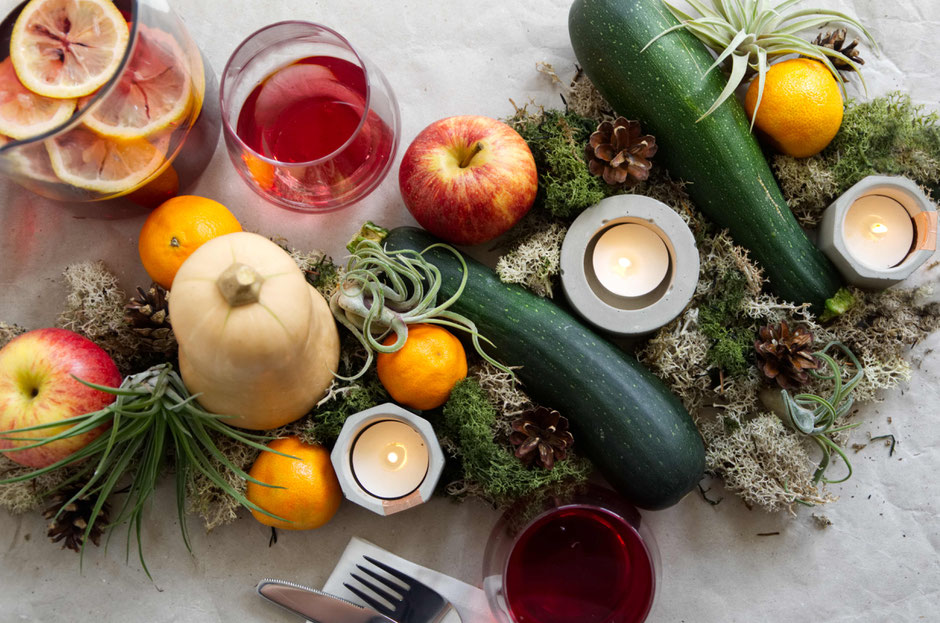
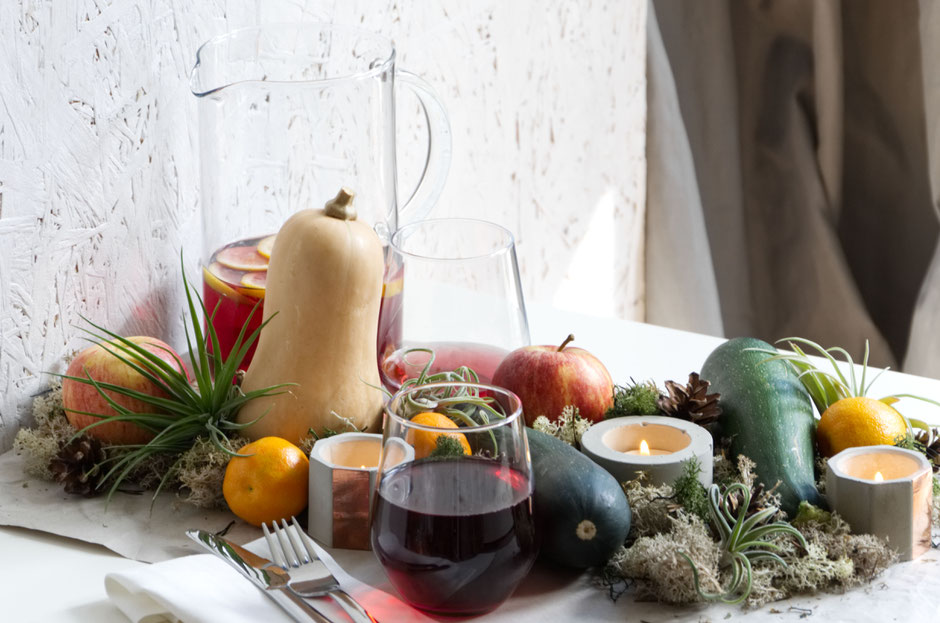
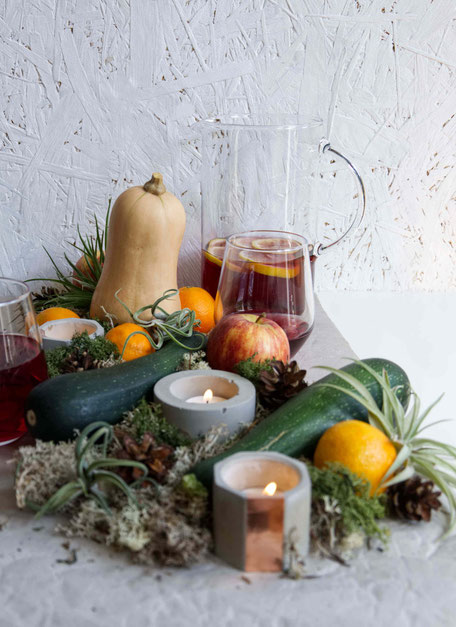
Thanksgiving & Autumn Feast Centrepiece Inspiration, With Concrete Copper Accents, Reindeer Moss, Pumpkin & Friends
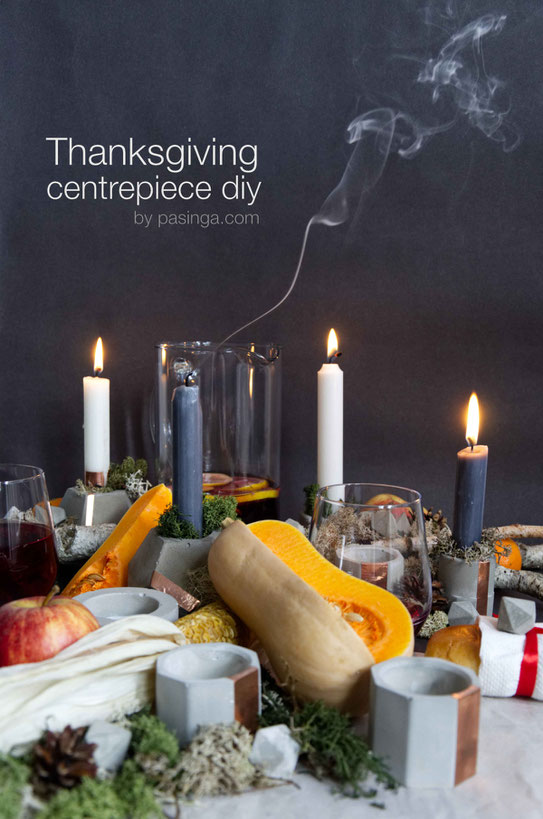
Warm colours, heavy fresh air in the morning and wonderful warm candle light evenings - November. I tried to exactly incorporate all those feelings in my Thanksgiving table scape. Even though we don't celebrate Thanksgiving in Europe, we do pumpkin feast and 'Herbstfest' I still have loads to be grateful for and like that about Thanksgiving. By far the most for every single design and creation I was allowed to craft and ship around the globe to wonderful customers and clients, indeed an amazing summer has gone bye.
Let me try to say thank you with sharing some decorative ideas on how to make an autumn celebration a beautiful one.
The base materials used....
Table cloth or paper, a mix of candle holders, Reindeer moss mix, pine cones, fresh fruit and veggies, some twigs, glasses and cutlery, you might need a knife, scissors and a lighter for set up

It is really up to you which fresh fruits and veggies you display but I considered three things. First, what will be added to the meal served, what is the season asking for and third, do the colours create a nice harmony. I cut the pumpkin as the smell is just delightful and a natural scent to the table which will enhance and not deviate from the mood. As for the sweetcorn, I dried it for a couple of weeks as I wanted the colours to feature a stronger contrast but I am sure a fresh one will do just fine.
Geometric Wreath DIY, Winter Decor Tutorial With Concrete, Copper And Evergreens
Amazing, isn't it?, to me it feels like the year went by way too fast so far but the Autumn glow is beautiful and after I have set up candles and pumpkins I can't wait to get my Winter decor up beautifully.
Since we created wonderful easy geometric wreaths for summer parties and so on I was thinking of using the triangular copper base once more for a winter wreath. This one will not be on my door but on my wall next to some soon to be there Christmas cards which I am going to display with my wall magazine display. Anyhow, that is my vision for now but to start the display off, lets get started with the wreath.
Materials are evergreens, pine cones, two pieces of copper, copper coloured nylon threat, cylinder concrete ornaments. Feel invited to add or change to your liking.


To create the wreath base, you first threat the copper rod with your nylon threat. I matched the coloured but black backer twine looks also good. Before you knot it at your preferred length you add the copper ring. The longer rod is about 30cm long and has a diameter of 5mm while the copper ring is about 5cm long and has a diameter of 3cm. For more details on how to get there and a step by step in pictures have a look back to the summer wreath variation here. Your base should look similar to the one pictured on the left.
Now it's time to take the largest piece of fir or other evergreen you might have. In regards to the size, it should not be much longer than the large rod but soft straying twigs from the branch
can overhang by 10 to 20cm as pictured below.
This branch/large twig goes through the wide copper ring first. Smaller twigs of the branch can be pulled out of the ring on the other side, to create an organic assembly.

I added an eucalyptus twig as well, for a bit of contrast and to soften the look. It all goes through the big ring. It should sit firm but the wreath is not ready to be lifted yet. Next, adding detail - pine cones and concrete ornaments, there are so many ways these could be added. I am after a natural look for the wreath with a bit of a modern twist. Since the wreath is not going to be on my door but still on my wall, I will add the concrete ornaments as long hanging eye-catchers. So that's the plan and to get there I started off by adding the pine cones first to the fir branch. As pictured above I knotted the small pine cones to the main branch, since the mint green highlight of the eucalyptus twig is just enough to compliment the shiny copper.
A Grownup Halloween Centrepiece Idea With Concrete, Moss And Air Plants
A proper Autumn tablescape featuring modern elegance and organic earthly produce. I know Halloween is coming up and I promised you I got you covered, so here is my rustic down to earth, natural 'grown up' way of an Autumn centrepiece and if you fancy it a 'BOo' or a face can easily be added to the pumpkin!
I don't know but with me being German and all, I grew up without these ghostly festivities, maybe I never really got it, but having said that, I surely enjoy a good table, nice company and great food. So let's create my table as base and spookiness will come with nightfall ....
Materials used:
Reindeer Moss Flakes; small pine cone mix;
Air Plants C. Medusae, B. Multiflora and Capitata Peach;
concrete cylinder candle holder;
concrete copper hexagon candle holder; fresh fruits and vegetables which will also be used to prepare the dinner;
grey craft paper as a table runner

Some notes on how to get started...
I started by placing the largest items first, second came all the candles for atmosphere. I think it is good to mix different styles of candle holders so feel free to mix. However, I decided against dinner candles as I wanted the pumpkin to be the eye-catcher. Mixed Reindeer moss flakes followed as well as small pine cones and different types of Air Plants.
Well, that's basically it but no one is stoping you from adding some spiders or worms into the mix!
Happy Halloween and a golden fall!
Antje
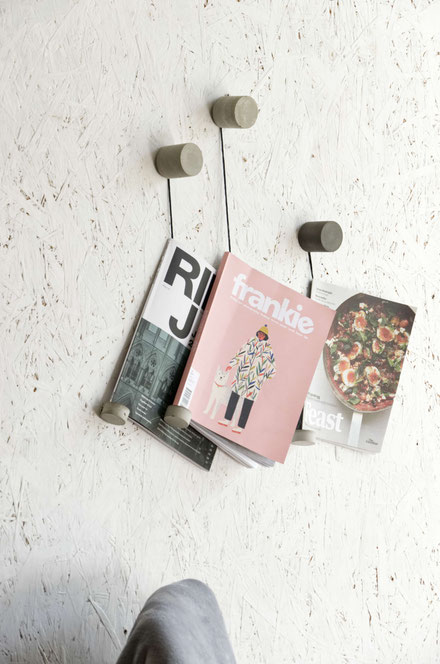
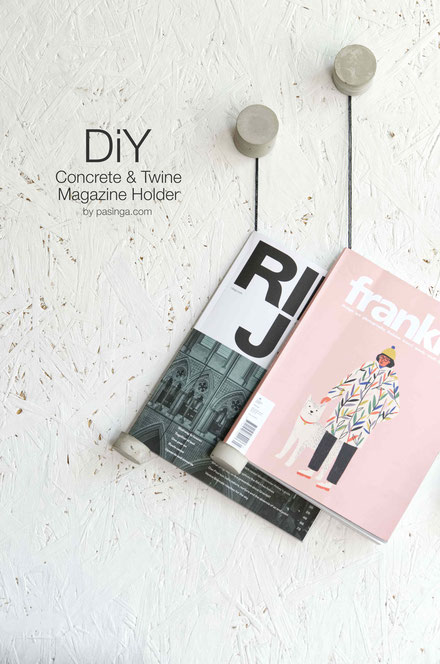
Minimal Concrete And Twine Magazine Wall Display or Book Holder Diy
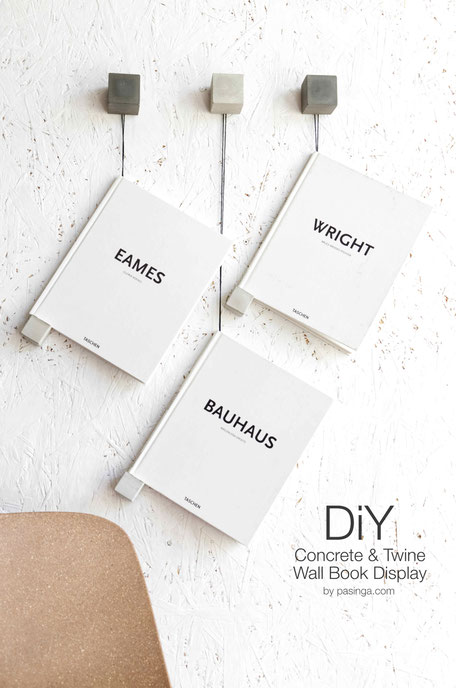
Materials:
Concrete Pendants - available here
Backer twine or ribbon - monochrome options are available here and in craft or stationery shops
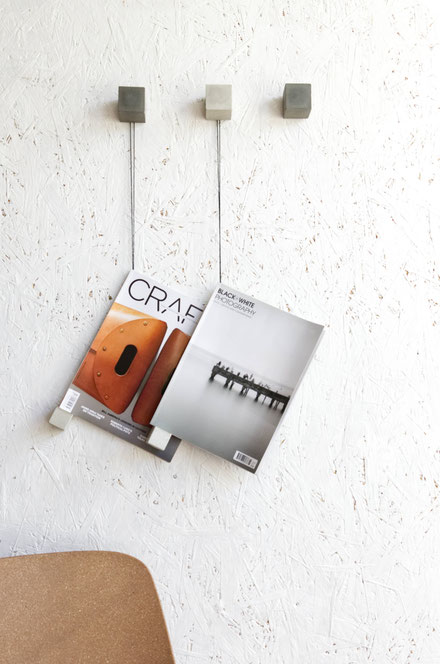
Well I know, we are not all cube fans, so here we go - the cylinder alternative. I don't know why but I felt this would be ideal for a kitchen or crafters corner. You know, it could keep the page of the next recipe to try or the one inspirational page.
For more inspiration
Oh look what I've got for you!
If you are a bit like me you like things being organised but love magazines and books too. I mean they are everywhere and I often feel inspired by books or magazines. So I decided to mix things up and found that this concrete & twine book / magazine wall display changed the feel of the room instantly.
This DIY is so easy that I am going to keep the 'how to' very short. Take your favourite twine or ribbon, maybe even think of the colours of the room, the magazines or books and cut the ribbon to desired length.
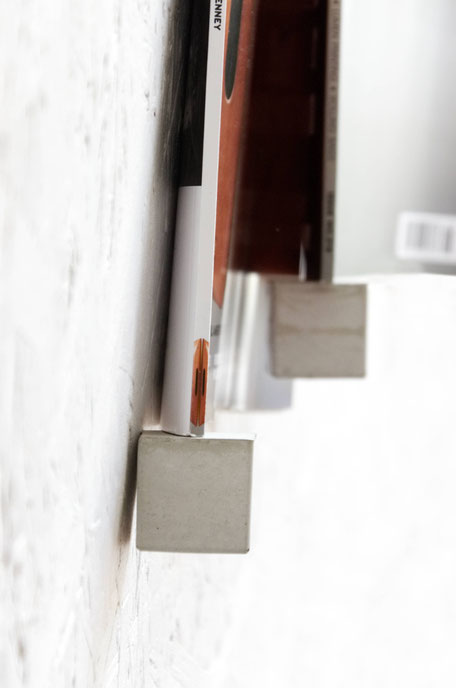
As you can see above I used varying lengths and the same length on the left. I felt that for books of the same size a varying length is best while for magazines the same length of ribbon looked perfect. Take the chosen concrete pendants as weight and stop for the book / magazine and thread it up. Make a knot with the twine ends, tadahh!
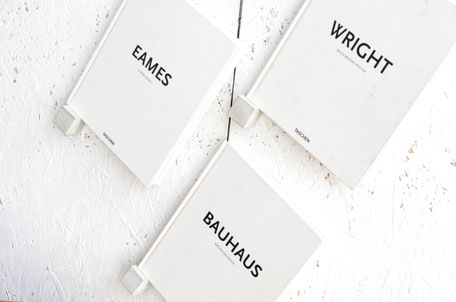
Just a quick note in regards to the wall hook/s to use. Well, I used concrete wall hooks, which I made myself of course since I wanted something of an artistic statement, but a silver, black or copper nail will provide an even simpler look. Picture pins will also do the trick, especially if you are using the holder to display, your notebooks and journals, Christmas cards or photographs.
Mmh... what else, nope, I think that's it. The only open question on my mind is, where are you going to hang yours?!.
Antje
Minimalism And Hygge - Hell Yeah!

I have heard about 'hygge' a while back and thought well, fair enough I like to cosy up, get the kettle on and the cosy blanket out. Done, right?!
Well, I went to Copenhagen during spring this year and of course what was the most interesting thing to bring back 'The little book of hygge' by Meik Wiking. I read it and found loads of habits and ideas on how we should make us all feel better. All nice and jolly. Thing is though, recently I came across more and more posts and articles like 'Hygge on a budget', 'Hygge vs Minimalism', 'Hygge for home and work' and so on. And two weeks ago I went to Germany, just to visit family over the weekend, you know the hygge way. At the airport I browsed some magazines and found that they even just published a magazine called 'Hygge' featuring all sort of lifestyle options and what we all should do to feel better.
I started to feel a bit irritated by the thought of hygge being a decor trend or even a must do now - it's a trend. I understand that we might want to look for beautiful items or cosy items that make us feel good. I am the last one not to understand that, I create and sell beautiful things myself and of course I want them to be precious treasures to you which make you feel good too. But that is just that - to make us feel good!
Well, I read some of those said articles in full and couldn't disagree more. Why should hygge not go with my / your decor. I hope to achieve at least in some areas a minimal life and I think hygge is never going to interfere with that thought.
Let's see, I live in a small studio flat in London. Yes, just a studio. I have to be organised or no work gets done. So everything has its place and gets put away. I don't have things twice and I need to be able to move things around for my photo shoots. If I feel things get to cluttery, you know magazines and books, I put piles together and drop them off at one of the station bookshelf or donate them. If I get something new the old goes. I think all this is pretty normal and very minimal. No budget requirements, no brainers, right?!
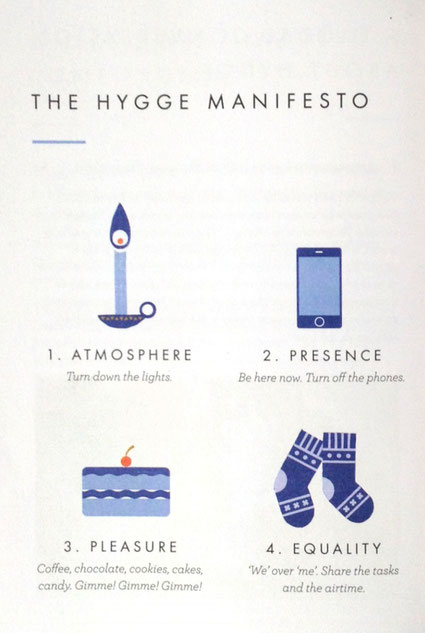
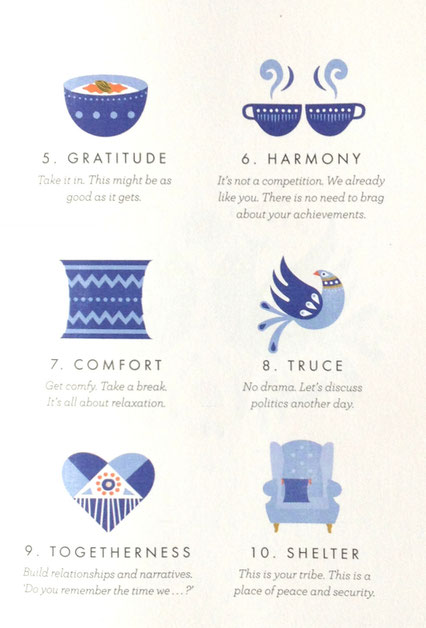
Maybe it is just me but one of the 'Minimalism vs Hygge' articles suggested that hygge asked for cosy clutter and clutter never works with minimalism. But I think the opposite is the case. Hygge and Minimalism are describing the urge to only use your most precious things to enjoy and decorate with. Only use the things that make you feel good. Neither, is asking for a sleek gloss white in all things for example. A clean space allows me too breath and feel fresh, even to recharge. So my room decor and surroundings are pretty minimal. However, I chose this environment to be 'hygge' in, if I might say so. I, of course, have good food and friends around to share it with or have a cuppa and a good book and my 'single favourite' cosy blanket in my minimal decorated room. Therefore I think minimalism and hygge both are not a budget thing nor are those two in a way against each other. If anything they compliment each other. To live with less you have to choose well and to keep only things you truly love. I would very well think that is point 10 of the hygge manifesto [picture on the left]. Your tribe, a place of peace and security can only be created with the things you love and have memories with. In a way I even would go so far that it is part of point 7 'Comfort'. Isn't it far easier to take a break and relax in an environment you feel free and home in?!
'Presence', 'Equality' and 'Truce' are more or less life choices and maybe even a choice of the company you keep. It is normal to me to shut my phone off when I am in a conversation and even though I do love all your posts and shares on instagram, facebook and so on, I do not need nor want to check the feed all night long. Although, I am writing loads of 'I' here and I like my alone time - I pretty much think 'we' over 'me'. With 'Truce' I am not so sure since my friends and I love good arguments but maybe I am taking it to literally.
Happy Easter Decor Ideas

Last minute Happy Easter decor ideas with items you purchased the most recently - for yourself or to give as gifts! Thank you!
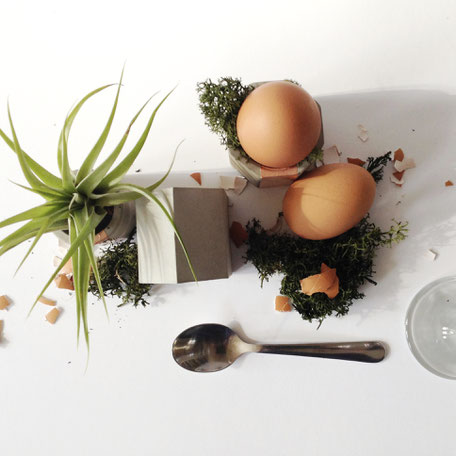
My favourite is the geometric bowl too! On the left I just added some dark green and pale Reindeer Moss to nest the 'boiled' egg. I am a fan of scrambled eggs and the egg shells make a wonderful Air Plants holder for this Capitata Peach. We are just two this year but if I had to build it up for a family table setting I would add more moss and eucalyptus, place in-between more Air Plants in egg shells. And of course some candles as shown below.
The trend of concrete and metal - I am still more into copper for its warm and inviting feeling and of course my brown eggs. But for all silver and white egg fans have a look at my concrete vessels with silver attachment and don't forget custom finishes are always welcome!
The grouping features the copper cups with a Multiflora Air Plant and I filled the
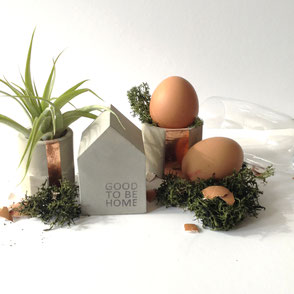
hexagon cup with Reindeer Moss to use it as egg cups. A bit of moss as well as egg shell bits around the feel good concrete house sculpture and maybe an egg or two placed in-between create a lovely happy functional centre piece, don't you think?!
Get Cozy For Winter With Candles & Concrete

Hygge Up!
It feels like winter is coming and the time for candles is here, so let's restyle our concrete vessels and accessories.
I have some vessels, dinner or taper candles, silver foil, Reindeer Moss, an eucalyptus branch and to set it all a lighter and bit of water.
One option would be to wrap a bit of aluminium / silver foil around the base of a candle. Please be messy and when pushing it gently into the recess of your vessel it will create different openings to place a bit of fir or eucalyptus.
My favourite option is to set a simple dinner candle with Reindeer Moss ....
You can set it with soft moss and keep reusing it. However, if you use a bit of water to wet the moss it will get hard when it is dry and offers a more stable fix. You will have to use water to
soften the moss again to reuse it.
Copper Twist - Copper Ideas For In- And Outdoors
Greens, stone, wood and copper an unbeatable beautiful combination.
I love how each material ages, on its own or together. The rustic charm and the interesting textures are wonderfully warm, industrial as well as natural and inviting. I am the kind of girl who
likes aged copper more than the polished kind but I guess that is just a thing of taste and I won't judge you if you don't judge me.
Well, I think - all I need now! is the space to make my rustic coppery industrial dreams come true.


Header Set - Concrete Copper Air Plant Holders, The 'Mix it!' Set
11 + 1 Simple Ideas To Decorate This Easter

11 simple ideas to decorate this Easter.
I always feel drawn to natural earthy tones and enjoy the light of pale shades of grey and whites. So here are some ideas I will draw inspiration from for my table setting this Easter.


7 Spaces That Make The Best Of Blush Tones
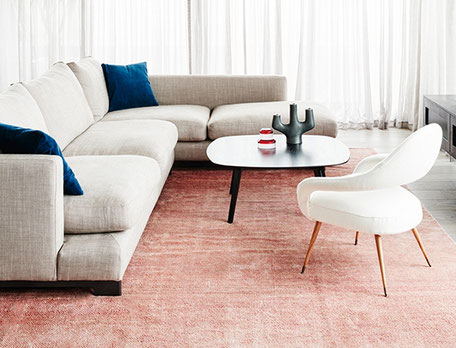
7- maybe 8 - spaces that are looking pretty good with a touch of blush. Soft or dusty pinks as well as copper tones are on trend but no wonder look at these places how welcoming and fresh they are. From chair to rug, paint or brick wall it is an easy add and a delightful hue to lift the spirits for Spring.
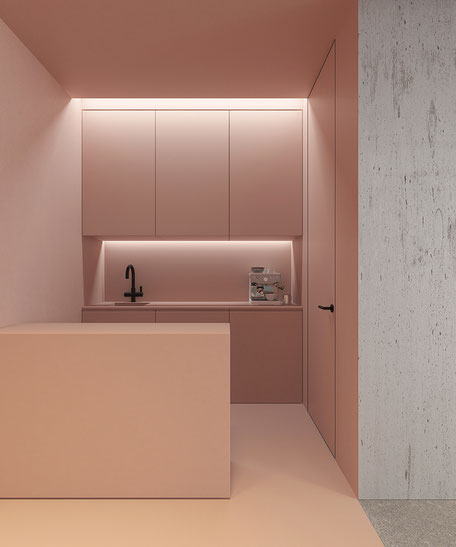
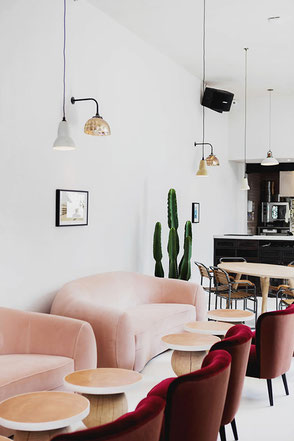
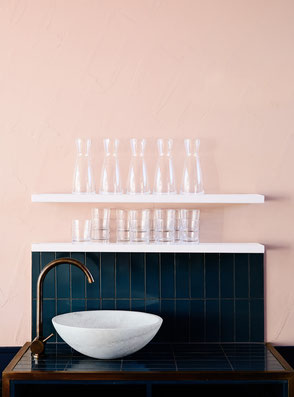
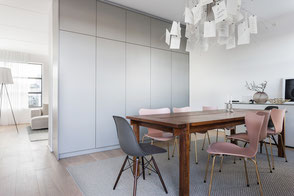
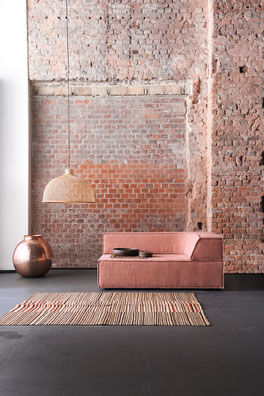
Do you have a favourite? - I like, when it is just touches and accessories, easy to change and offering endless options.
xx

... Do[n't] go overboard .... !?!
7 Monochrome Interiors That Inspire To Add Cozy Grey


So calm and so inviting to relax and breathe - cozy greys.
It doesn't matter which shade is for you as the calmness of grey always compliments your lifestyle. To me a dark grey is the best fit for spaces to rest and cuddle up and a lighter shade works better for a living or dining room. Mmhhhh well, I am in love with everything grey scale, it's timeless, elegant, simply beautiful but I guess, and since you know my work, you knew that already.
Anyhow, I can imagine it to complement a gallery wall of monochrome art prints as well [uuhhh - I think a new gallery wall post just came up] or to help a room with bright and colorful
treasures to calm down.
Magical grey inspirations,
Antje xx
The Warm 'Wintery' Feeling

When I look outside I see the leaves still turning into lovely brown and golden colors. Only from time to time there is a proper fresh winter breeze but I feel Christmas is coming and the
cravings for hot cocoa and chocolate cake are bang on time. You know what I mean - don't you?! So it is no surprise that I feel drawn to and inspired by the pallet of dark to golden brown colors
these days.
Joyful inspiring Friday lovelies and I hope this warm 'wintery' feeling is contagious,
Antje
xx
This collection is curated with images found
via Pinterest and PASiNGA.
Find all images on my pin
board and
the Concrete Copper Air Plant /Tealight Holder Cup as well as the Big Splash Notebooks are available on this site!

Time To dream

Time to dream - Halloween has gone by, the first lights for Thanksgiving and Christmas appear here and there and Bonfire Night is coming up this weekend. Altogether, the warm green and brown
colors outside as well as the shiny golden lights invite to relax, make notes, sketches or to read.
Happy day and inspirational dreams lovelies,
Antje
xx
This collection is curated with images found
via Pinterest and PASiNGA.
Find all images on my pin
board and
the Mix it! Concrete Copper Air Plant /Tealight Holder Cups are available on this
site!
Autumn Colors

Autumn is finally here and everything feels cosier, chocolate tastes better and the early evening candle light is a joy for my soul. Yes, that’s right I don’t have a fireplace but a girl can dream, right?! Anyway since candles are my thing right now I created new concrete shapes to hold all
sorts of candles and most of them double as Air Plant holder as well, happy browsing!
I am looking forward to a Saturday full of work and a Sunday afternoon with my family. Happy weekend lovelies, see you,
Antje xx
This collection is curated with images found
via Pinterest and PASiNGA.
Find all images on my pin
board and
the Concrete House Air Plant Holder
are available on this site!
A Monochrome Dynamic

The combination or contrast of black and white can be dynamic and powerful as well as calming. I am not sure what it is but the elegant monochrome shades of black and white fascinate me not only
in design, home decor and fashion but in life general. May this board inspire and reflect,
Lot's of love,
xx
This collection is curated with images found
via Pinterest and PASiNGA.
Find all images on my pin
board and
the Concrete Diamond Air Plant Holder as well
as the Concrete Notebook collection
are available on this site!
Shiny Copper & Emerald Green
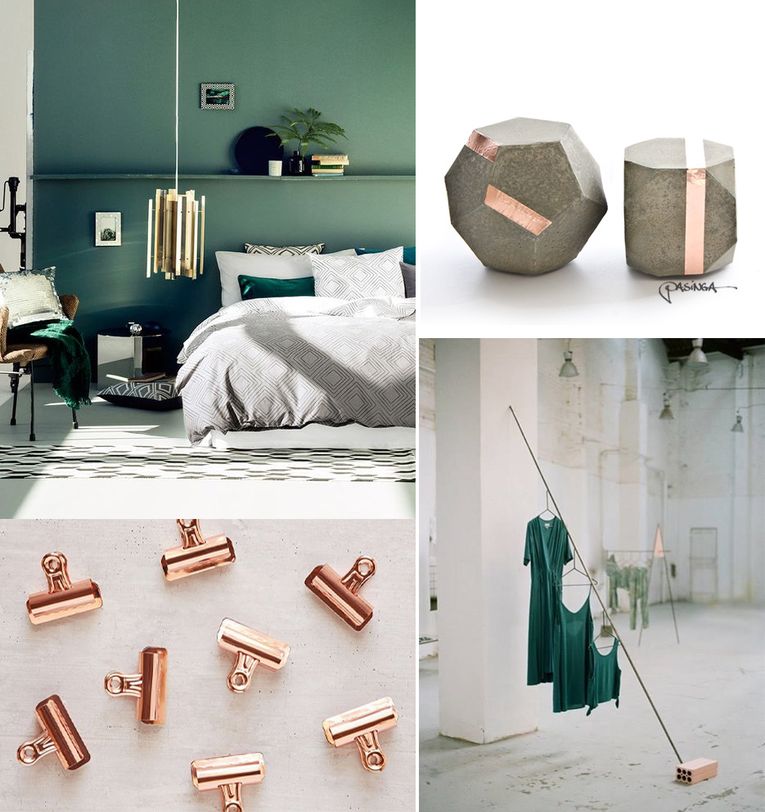
Green is a happy, hopeful color but add the twist and warmth of copper or rose gold, it's magic ....
... pure elegance and glamour.
Lot's of love,
xx
New York Fashion | Blue

My trip to New York during Spring last year ...
... was the inspiration for this visual board. Not only were we lucky enough to have blue skies and sunshine but the city itself offered this pigeon blue note
within the streets and stunning glass facades. Well not to mention the fashion sense all around us ...
Lot's of love and a blue sky for the weekend,
xx
Just A Hint Of Spring, Soft Greens & Greys

Just A Hint ....
of mint, of green, of spring. A peek around the corner, a little adventure, finding the new, exploring the wild, finding the beauty, mixing vintage with the less,
just a gentle touch, seeking inspiration .....
Creative day,
xx
Adore Industrial

I am sharing today my absolutely well kept secret with you
- I Love Monochrome!
Okay, not really a secret but truly my passion and how I would like the world around me to be.
Let's adore the contrast and dynamic together!
Lot's of Inspiration,
Antje
Wings of Inspiration

I just felt like gold after this exciting week. I got lots of inspirational input from other artists, worked on new designs, finished custom pieces and had most of
the time black hands. Loving black pigments and all the shades of grey coming with it! So here we go.
This collection is curated with images found
via Pinterest and PASiNGA.
Find all images on my pin board but
the Concrete Diamond Push Pins are here as well!
Green Contrast

It is that time of the year ...
... where a popping greens and snow whites are an absolute magical must. It's a classic combination yet always fresh, bright and minimal. Maybe the above includes your preferred shade as
well?
Have a wonderful weekend and happy gift shopping,
xx
For more of my Concrete Pieces
why not click here and more Art
Prints
can you find over here.
Enjoy your stay!
Images via Pinterest and PASiNGA
[source and more on my Pinterest board 'Moodboard Pins']
Festive Table Settings
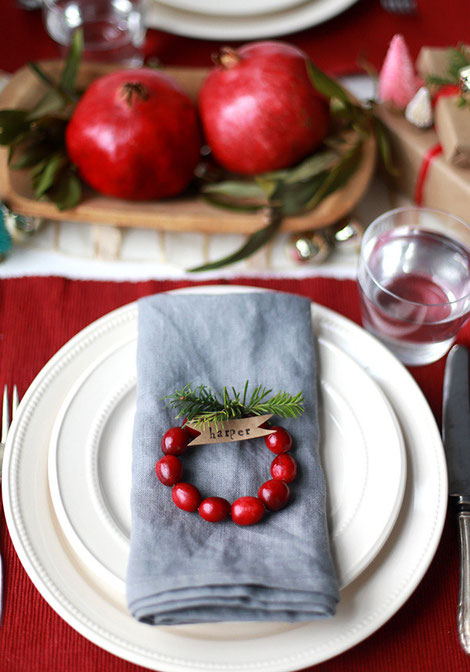
... and to finish your table setting with the most magical Victorian Christmas Candle scent ever
>>> Ville De Fleurs <<<
created a coupon code exclusively for us
15% off | villedefleurs.com
... oh I can smell the Christmas pudding already!
I think everyone loves a beautiful table setting. It's inviting, thoughtful and a joy to set up, isn't it?
So many stunning ideas created by such amazing talented people. I felt so inspired and decided to share my favorites with you. After all it's part of our Advent Calendar to help us get ready for Christmas and I might have a little voucher for you.


Beautiful Winter Garlands


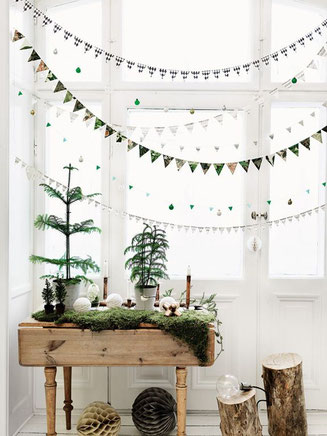
The best thing is that many of them are just paper dots or paper cut snow flakes sewn together. Other are just paper arrows glued over a string. Just choose you color theme and the required
length and you are good to go.
I love all of them and I don't know for which one I will go but one thing is for sure I will have garlands this Christmas.