
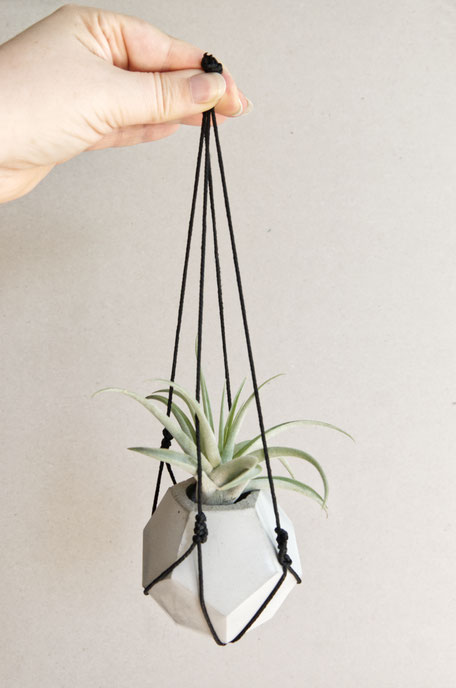
How To: DIY Macramé To Hang Your Geometric Concrete Planter
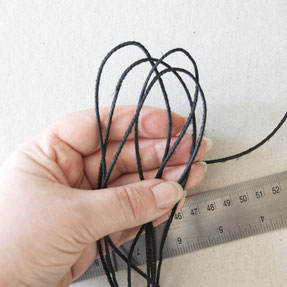
I used the same things like last time as I thought you either purchased some of the things you need or have them already. In any case I did not want to cause waste. So get your ruler, scissors, your vessel and plant, and of course string, twine or ribbon you wish to use.
My vessels, I used this netting for are both, are about 10cm tall and the plant, Air Plant Capitata Peach, adds another 10cm. To measure the string length I went for 4 times the length.
After my last DIY Macramé to hang your geometric concrete vessel I received so much amazing feedback - thank you! and a lovely comment requesting one without the tassel. You are absolutely right, the tassel is an additional eye-catcher which could take away from the geometric vessel or plant. It took me a moment to find a way but here we go ...


Altogether you need 4 strings no looping [the other macramé can you find here] this time. So we are working with 4 strings each at least 60cm but not more than 80cm long each.

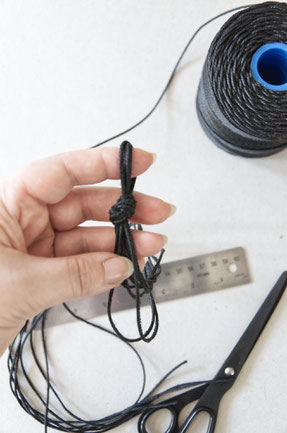
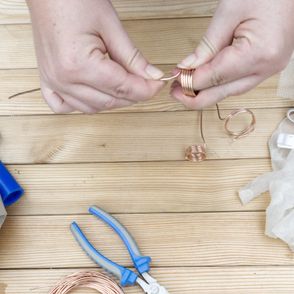
Take four endings and knot them together tightly by pulling each string ending individually until the knot stops going tighter. If you use a nylon string you could use a lighter to melt the endings together neatly above/ into the knot. Tip, use the metal ruler to flatten the molten ending.
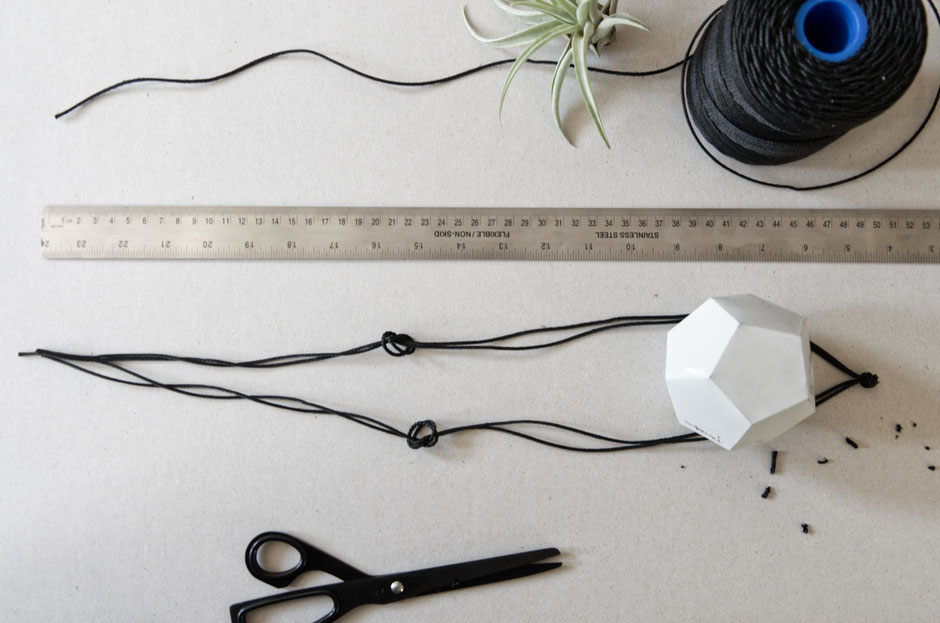
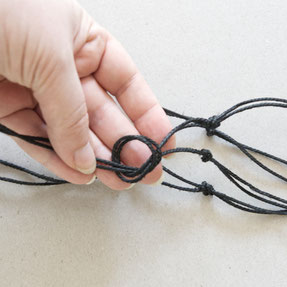
Now, use your vessel and place it with space around it in front of you. Part the four strings and lay it around your vessel. There should be two strings to each side which you start knotting together. The height for the first row of knots will depend on the height of your vessel. Mine is 10cm plus plant height so I went for something above 25cm for my first netting nots measured from the string endings.
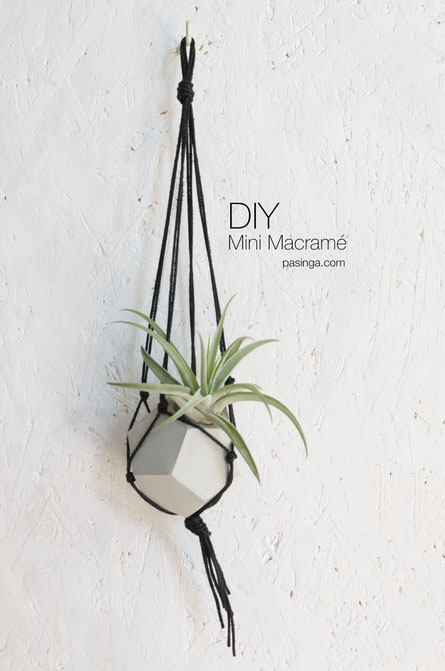
How To: DIY Tassel Macramé Plant Hanger
As you can see on the right all you needs is some twine or string. Of course there is proper macramé string available but you can use any string you have on hand for this design. Your vessel and plant, ruler and scissors.
My vessel is about 10cm tall and the plant adds another 10cm. To measure the string length I went for 3 times the length.
Macramé hanging planters are everywhere and why not?!? They are beauties, space saving while giving a delightful happiness to the place where they have been hung. So while organising my own display I decided why not give it a try but of course not without showing you how I did my mini tassel Macramé variation.
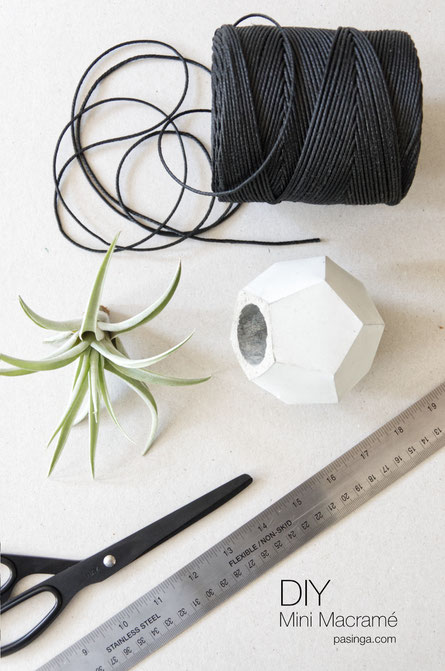
Altogether you need 4 strings looped to 8 endings. Which gives you 8 strings, not all cut, each 60cm long or 4 strings each 120cm long before folding it to half the length of 60cm.
Now take the looped string ends and knot them together. Try to keep a finger or a pen in the loop to make an even knot. After the knot is in place fasten it by pulling on the strings one by one.
From there we will use simple knots as shown above to knot two strings each time.
How To Work With Concrete, Basic Tips & Tricks

Concrete is a wonderful versatile material to work with. What concrete is, how to get started to work with it and what tools to use, here are the basic tips and tricks as well as answers to your most asked questions since I started my DIY's.
What is concrete?
Even though cement and concrete are often used to describe the other, or as equal, they are not the same. Concrete was first used thousand of years ago in roman structures. However, cement and concrete are not one and the same but rather that cement forms part of concrete. The term ‘concrete’ is used for the material that is created from a mix of aggregates, mostly stones or sand with cement that is activated with water. Once this mixture reacts, which is also called the curing process, a bit of heat is generated. Once this is done it cools back down and the concrete is almost as hard as stone.
Which concrete mix to use for which crafting project?
Mostly lime-based cement which is also know as Portland cement or all purpose cement. It is most often used with gravel or crushed stones, glass shards to craft sidewalks, stepping stones, maybe chairs or tables, large planter bowls and so on. This is a mix for larger crafting projects.
For smaller projects a finer mix should be chosen. You could still start with an all purpose cement and just use finer aggregates like sand, if you use - like I do - coloured sands it will also change the final colour of your concrete. You could also use fabric or styrofoam balls or used shredded plastic. I have seen rubbish shredded and used as aggregate to create tiles at the Venice Biennale for example. Just keep in mind the smaller the object you are crafting, the finer the aggregate should be.
Anyhow, if the objects are small a quick mix, which usually has all what's needed combined already, is often a good to go solution. You simply add water and you are good to go for small projects like the candle holder or Air Plant stands.


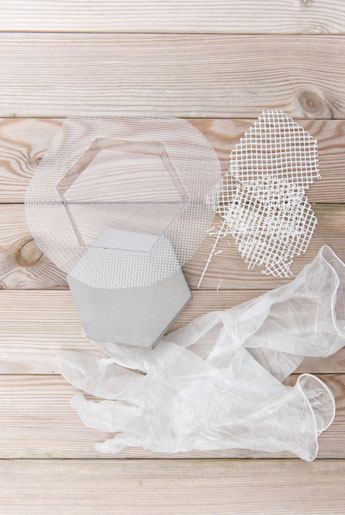
Indeed you should protect yourself!
Concrete, can be a messy material and it should not be on your skin which is why I recommend some simple gloves. Of course it is best to protect your eyes and as the dust can be harmful to your lungs a mask as well as glasses for eyes are advisable.
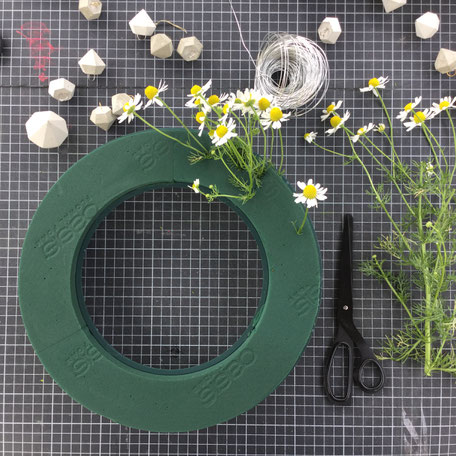
How To Make This Modern Garden Flower Wreath
Let's bring a bit of summer inside with a fresh and bright garden flower wreath design. After all a modern wreath can be a wonderful decor accent all year around.
So what do we need for this summer blossom dream?
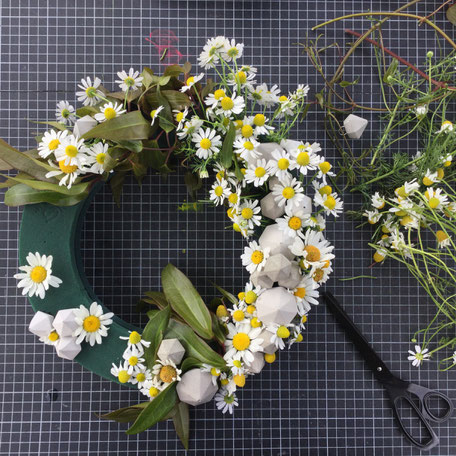
A plug foam ring in your preferred size but I have chosen one with an outer diameter of 30cm.
I am using my favourite flowers and herbs as well as some simple long leaves. So there are three types of flowers for me but if you have more to choose from go wild and bring your whole summer meadow into this wreath. For me it is about 5 camomile stalks, 10 daisy stalks and 10 long big leaves. I have no idea what they are called but I like them and they have been here since before we moved in.
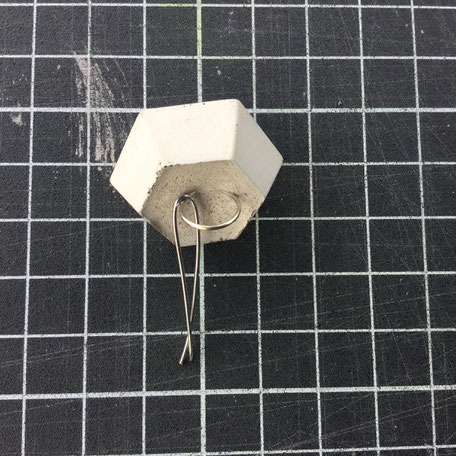
Anyhow, this is of course just an estimate and if your flower heads are bigger of course you will need less. Additionally, as you know, I can't do without a bit of a modern geometric edge so I used the concrete diamond ornaments and extra wire.
I started with watering the ring by having it soak up water in my sink. Since I just read it, do not push it under water but rather lay it on top and wait for it to soak the water in. So I am guessing by now you know, first timer ;D
Took about 20 minutes but I made use of the time by cutting and sorting my flowers. I also prepared some additional wire for a stronger fix of the concrete ornaments within the wreath.
DIY Rhombus Concrete Coaster Tutorial, just because we can!

Here we go again, anyone else having an ABBA day?! No, just me, ok! At the end of February I posted my first coaster Diy, the hexagon shape, and I was excited to receive your emails and feedback. It was just lovely to receive that request for another design to mix things up as well as the note if I could make it even clearer how I mean the 'air needs to get between concrete solid and mould' during the release process. So here we go, drumroll please!, welcome the rhombus design to craft another modern coaster!
Materials:
hexagon plastic moulds or a self build mould, fibre mat for reinforcing, concrete mix, mixing tools like plastic spoon and cups or containers and maybe sanding paper / sanding block, and for your safety - glasses, a mask and gloves
Workstation & Time:
It is best that things remain where they are poured for at least 3 to 4 hours for most fast setting mixes or 24 hours for a standard mix; it helps if the surface is flat and fairly straight; Minimum time required is 4 hours but you will have at least 3 hours free time in-between
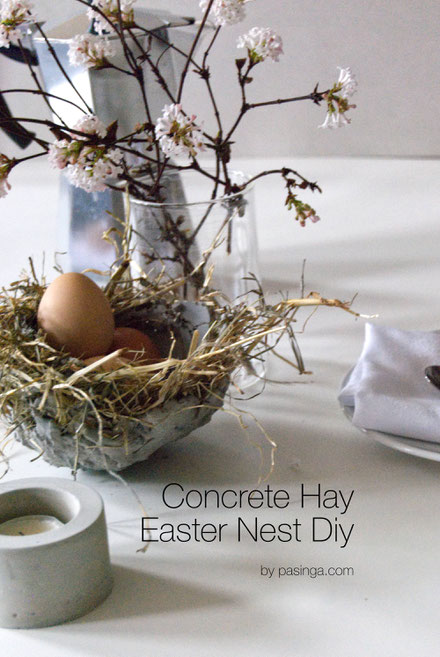
A Fun Family Concrete Hay Easter Nest, Bowl Or Planter Diy
Workstation & Time:
It is best to set up your workstation outside as this is a proper hands on concrete Diy and things will get messy!
Also, things should remain where they are poured and hand formed ;) for at least 3 to 4 hours for most fast setting mixes or 24 hours for a standard mix; it helps, if the surface is flat and fairly level; minimum time required is 4 hours but you will have 3 hours free time in-between.
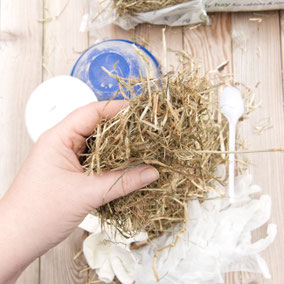
An Easter nest DIY made of concrete and hay or straw the perfect modern and crafty decor accent for the in- and outside. What can I say, it's an incredible fun to form these nests / bowls / planters by hand and just about right to enjoy with friends and family!
Materials:
rabbit/bunny straw or hay mix to form the nest; an old bowl, balloon or styrofoam you might have to re-use to form the nest over; an old surface as things get messy; concrete mix, mixing tools; and for your safety - glasses, a mask and maybe two or three sets of gloves

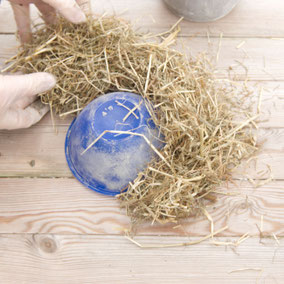
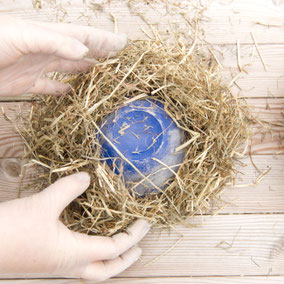
Ready?! Lets do this, excited!!! - I am going to use the small blue plastic bowl for the first nest variation and the balloon to form the second nest. To start let us get the bowl and hay set up as pictured below. I got dressed too as it is a bit windy today and I want to add the concrete as quick as possible. I put the hay/straw all around the bowl and a bit on top. Furthermore, I have it all together sitting where the concrete can cure and dry for a couple of hours once I am done forming it.
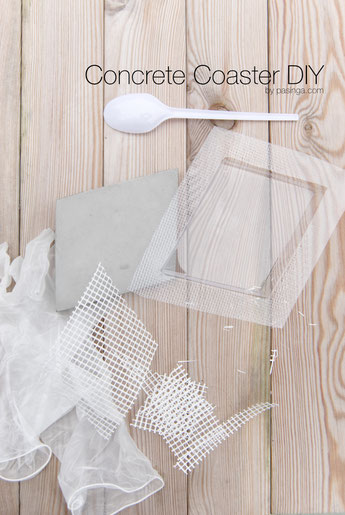
Modern DIY Hexagon Concrete Coaster Tutorial
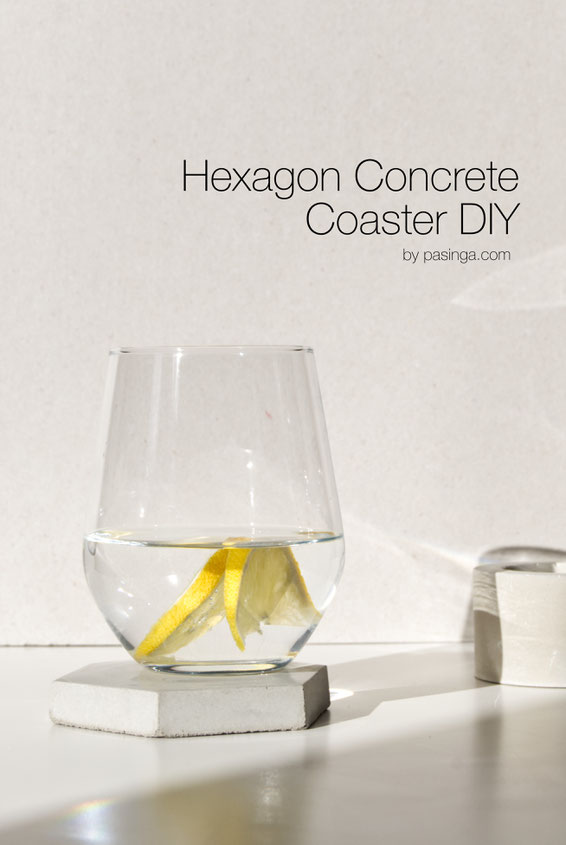
Spring is almost here and with it my desire to refresh and restyle my home. I hope I am not alone but I just fancy that fresh breeze, the soft spring sunshine and hope to catch it inside. I never really use coasters, no expensive furniture here, but my friend asked me about it and so did my mom and I just thought why not. I mean, they can be used in so many ways anyway, so here we go ... let us craft modern concrete hexagon coasters together!
Materials:
hexagon plastic moulds or a self build mould, fibre mat for reinforcing, concrete mix, mixing tools like plastic spoon and cups or containers and maybe sanding paper / sanding block, and for your safety - glasses, a mask and gloves
Workstation & Time:
It is best that things remain where they are poured for at least 2 to 3 hours for most fast setting mixes or 24 hours for a standard mix; it helps if the surface is flat and fairly straight; Minimum time required is 3 hours but you will have at least 2 hours of free time in-between
Winter Wreath Decorating Tutorial

December is here and I am decorating my studio with little bits of green to surround me with some festive mood and coziness.
To me Winter, and maybe Christmas, warmth comes from a bit of of evergreens, pine cones, moss and candles but also from a bit of crafting just for myself. So here we go, a wreath DIY to get the spirits up. I promise these two are fairly easy and you can incorporate almost anything you are pleased with or cherish the most.
Materials and tools ...
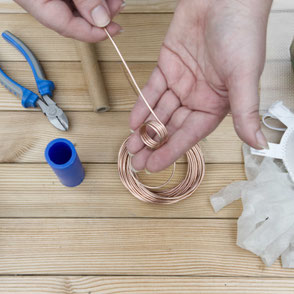
I am using copper coil which I bend over a bucket, about 30cm in diameter, to have a wonderful circular shape for the first one. However, you could also use a wooden loop, a proper wreath ring available in a lot of sizes.
In contrast I am going to use the concrete cube ornament set, some greens and simple dark green evergreens. You will also need some scissors, twine or threat, alternatively some wire, and a gardening scissors to trim the greens.
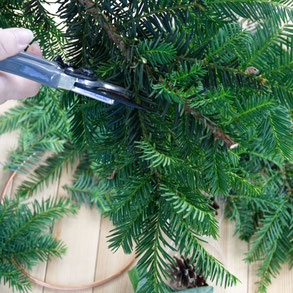
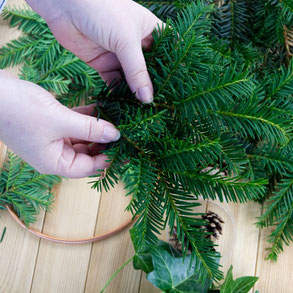
Just like the pictures on the left show, I am cutting off some smaller, softer twigs, preferably with beautiful fork like tips of the branch. I place them in bundles on top as well as closely next to each other to create volume and attach it to the wreath as shown below.
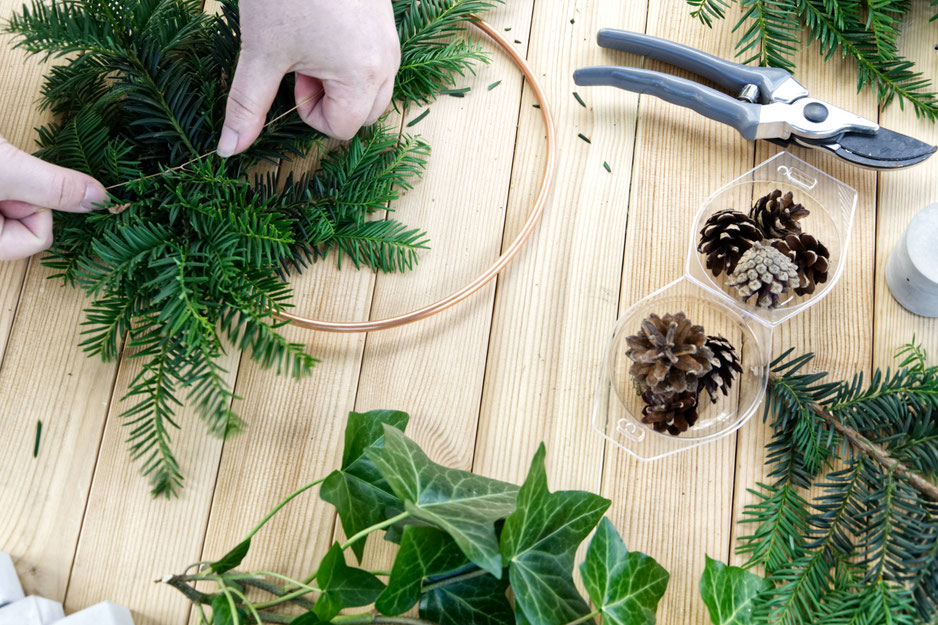
I am using copper coloured nylon threat. I find this more flexible compared to wire and easy to handle. You can attach the green first and cut the threat but I use a long threat on purpose as I will use it to attach some ornaments as well. So I took my bundled greens and placed them to the [when hung] lower side of the ring and knotted the greens to the copper ring.
Wonderful Warm, Geometric And Eco-friendly Christmas Gift Wrapping Ideas

Is there anything more exciting than wrapping a gift in anticipation of happy smiles and bright eyes, warm hugs and wonderful memories? Nothing right?!
This year is especially exciting to me as my new concrete ornament series is available and new gift wrapping designs can be
created but also because of the ever growing Furoshiki trend [where you use reusable fabric to wrap your amazing gifts]. So I decided all the presents for the adults will be gift wrapped in linen
scarfs and kitchen towels - haha guess who gets which?! Right, men have to help with the dishes!
However, for my nieces and nephews I will stick to recycled paper so that they can rip it apart and enjoy that moment to the fullest.
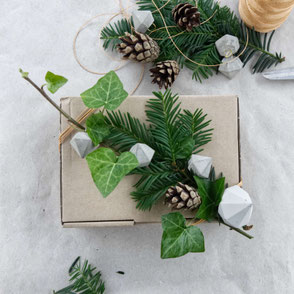
I am not sure about you but once I had that sorted I felt drawn to a bit of foliage this year. Last year I was more minimalist with just tags and cards but this year a bit of warmth is required and I think a bit of fir and other evergreens could just do the trick. Instead of having cards this year I will just write the names on the present or concrete gift tag, got my gold and silver paint pens ready already! Let's see - above and below are some ideas I came up with during my photoshoot but there are also some additional ones I feel heavily inspired by.

Some things don't need extra wrapping, they are just too pretty and so I decided some nice twine, evergreen, a pine cone and a geometric concrete pendant is just about right to let it shine even more and give it that personal touch.
Diamonds are always a good idea or so they say, do I need to say more?!?
And to the right - a minimal almost masculine way to wrap a present - recycled grey paper, dark baker twine and hexagon ornaments.


Up-cycling a bit of newspaper or magazines can add such a wonderful warm twist, cherry on top, or so it feels, is this wonderful ripped fabric ribbon. More ideas are on my Pinterest wrapping board and more details and a picture guide to Furoshiki for beginners is on my blog but doesn't this just look stunning, even though it is just an ever so simple knot. Oh I am getting excited - I think my wrapping is sorted, not all the gifts though even though all the designer makers of my little Christmas gift guide series over here have been very helpful - have a click for inspiration!
DIY Floating Pine Cone Concrete Christmas Tutorial With Plastic & Aluminium Moulds
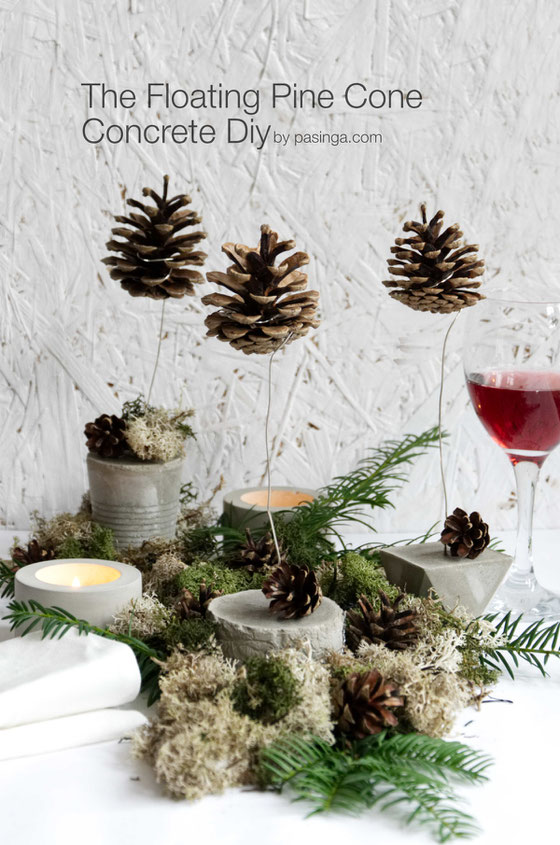
I think, I've got the most fun DIY concrete tutorial for you yet!! What could be more Winter than a bit of snow, candle light evenings and pine cones around the house - nothing right?! Not to mention the Scandinavian decor trends which all feature prominently pine cones in all sorts and sizes and why not, it's a natural beauty.
My take is to display them floating which makes a perfect eye-catcher on a sideboard, window sill or adds an extra dimension to a table scape or buffet display. But enough with my decor phantasies let's get right to it and make these floating pine cone concrete stands first!
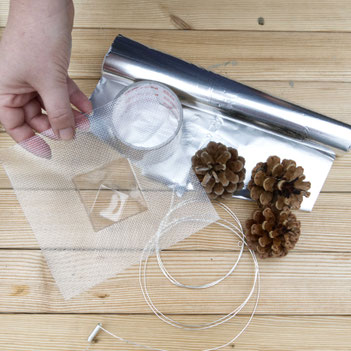
Materials:
As many recycled mould or plastic moulds as you want to craft,
wire in your desired finish, Aluminium kitchen foil, large pine cones, concrete mix, mixing tools and maybe sanding paper,
and for your safety - glasses, a mask and gloves
Workstation & Time:
It is best that things remain where they are poured for at least 2 to 3 hours for most fast setting mixes or 24hours for a standard mix; it helps if the surface is flat and fairly straight; Minimum Time required is 3 hours but you will have 2 hours free time in-between
Geometric Wreath DIY, Winter Decor Tutorial With Concrete, Copper And Evergreens
Amazing, isn't it?, to me it feels like the year went by way too fast so far but the Autumn glow is beautiful and after I have set up candles and pumpkins I can't wait to get my Winter decor up beautifully.
Since we created wonderful easy geometric wreaths for summer parties and so on I was thinking of using the triangular copper base once more for a winter wreath. This one will not be on my door but on my wall next to some soon to be there Christmas cards which I am going to display with my wall magazine display. Anyhow, that is my vision for now but to start the display off, lets get started with the wreath.
Materials are evergreens, pine cones, two pieces of copper, copper coloured nylon threat, cylinder concrete ornaments. Feel invited to add or change to your liking.


To create the wreath base, you first threat the copper rod with your nylon threat. I matched the coloured but black backer twine looks also good. Before you knot it at your preferred length you add the copper ring. The longer rod is about 30cm long and has a diameter of 5mm while the copper ring is about 5cm long and has a diameter of 3cm. For more details on how to get there and a step by step in pictures have a look back to the summer wreath variation here. Your base should look similar to the one pictured on the left.
Now it's time to take the largest piece of fir or other evergreen you might have. In regards to the size, it should not be much longer than the large rod but soft straying twigs from the branch
can overhang by 10 to 20cm as pictured below.
This branch/large twig goes through the wide copper ring first. Smaller twigs of the branch can be pulled out of the ring on the other side, to create an organic assembly.

I added an eucalyptus twig as well, for a bit of contrast and to soften the look. It all goes through the big ring. It should sit firm but the wreath is not ready to be lifted yet. Next, adding detail - pine cones and concrete ornaments, there are so many ways these could be added. I am after a natural look for the wreath with a bit of a modern twist. Since the wreath is not going to be on my door but still on my wall, I will add the concrete ornaments as long hanging eye-catchers. So that's the plan and to get there I started off by adding the pine cones first to the fir branch. As pictured above I knotted the small pine cones to the main branch, since the mint green highlight of the eucalyptus twig is just enough to compliment the shiny copper.
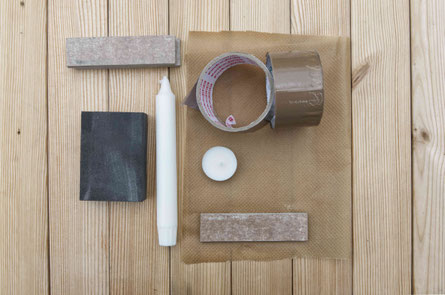
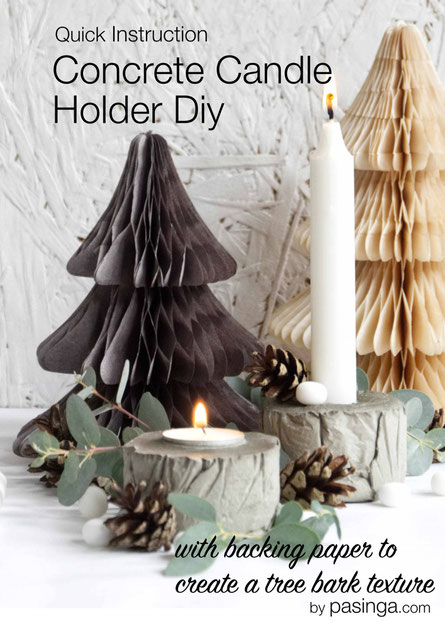
Candle Season! DIY Tree Bark Baking Paper Concrete Candle Holder Tutorial
It's official - the candle season is here, is it not?! Well, I think I waited long enough, mind me I am lighting candles since September and it's just wonderful how cosy my tiny studio feels. It is small all the time but you know what I mean, the warm light is the essence of hygge I think. Anyway, that's not what todays blog post is about - my fabulously easy baking paper concrete candle holder tutorial!!! Yes, you heard right we are going to create a bit of a tree bark texture with something as handy as baking paper. We wont need any grease, fat or tape at all. In a way or two it will feels like baking but what do I know, I can't bake even though I enjoy a good cake like no other. Anyway, moving on - shall we get started?!
Let's sort the materials first...
For the mould - could be any cardboard or plastic mould [large yogurt cups for example], whatever you find or could recycle, the only thing I would not recommend to use is glass or ceramics. And of course you could use my moulds too!
Furthermore, backing paper, smooth or with waffle texture, makes no difference, and the candles you wish to use this season. Some wood cut offs or sticks could come in handy. Mixing tools, like a bowl and big spoon or whisk, water and quick setting concrete pre mix [like Jet or BlueHawk] and a bit of sanding paper. I am sure your local builders depot will have something in stock. The only thing which matters for this project is that it is 'quick set'. And to keep you save - please some rubber gloves, a mask and glasses.
Project time will be altogether about 1 to 2 hours. However, you will have spare time of about 3 hours before the candles holders can be unwrapped and finished.
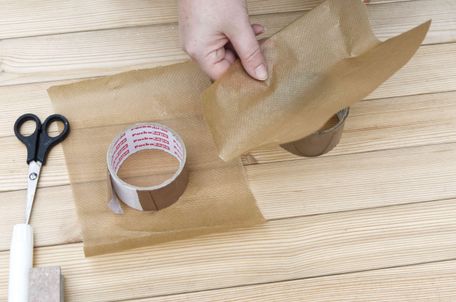
I am using a large brown tape rolls. I cut two large pieces of baking paper. As the picture suggests at least 2 times the diameter of the tape roll.

Cover the inside of the mould. Make sure you go all the way down so that a proper base can form and your candle holder does stand safely.

Don't mind the creases and wrinkles, you want them to create the texture. Bend the remaining bits of the baking paper over the top like shown above.
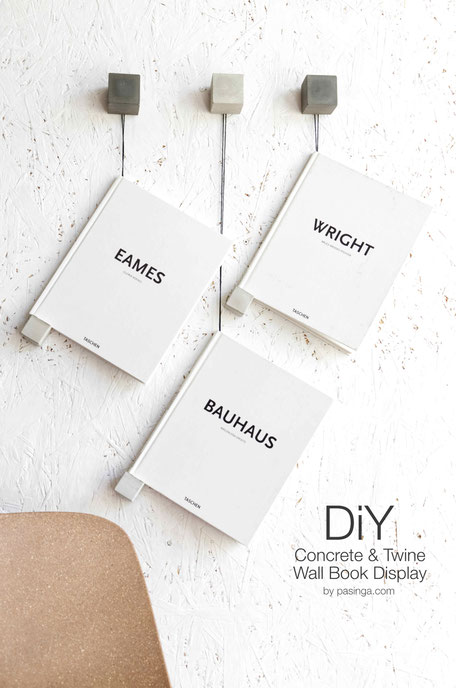
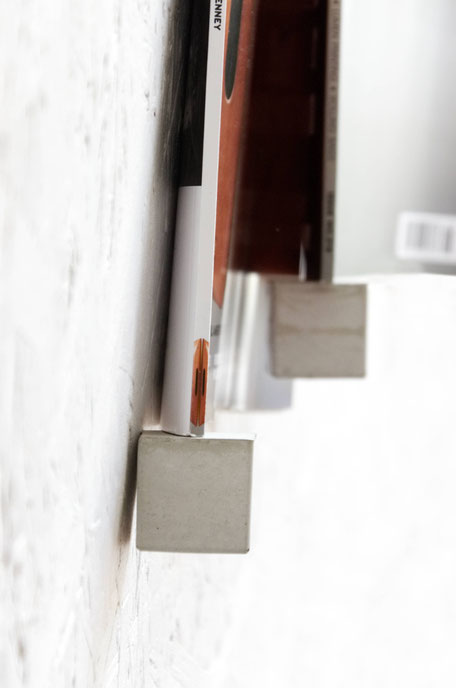
Minimal Concrete And Twine Magazine Wall Display or Book Holder Diy
Materials:
Concrete Pendants - available here
Backer twine or ribbon - monochrome options are available here and in craft or stationery shops

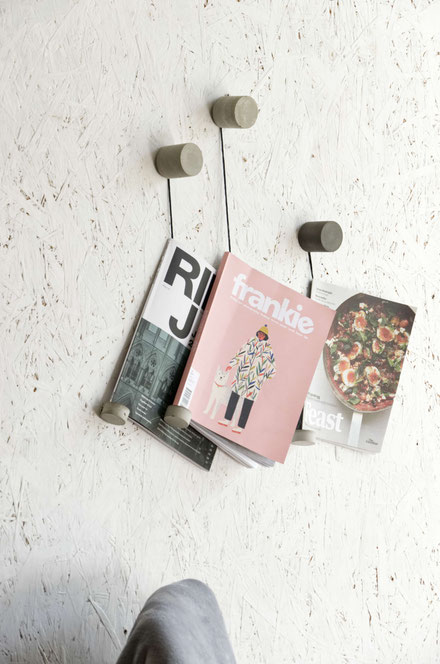
Well I know, we are not all cube fans, so here we go - the cylinder alternative. I don't know why but I felt this would be ideal for a kitchen or crafters corner. You know, it could keep the page of the next recipe to try or the one inspirational page.
For more inspiration
Oh look what I've got for you!
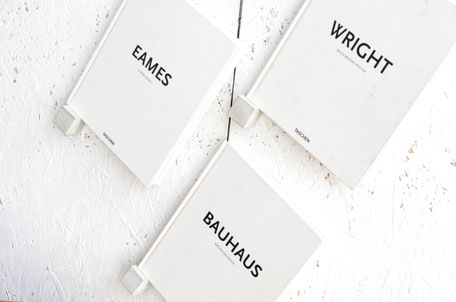
If you are a bit like me you like things being organised but love magazines and books too. I mean they are everywhere and I often feel inspired by books or magazines. So I decided to mix things up and found that this concrete & twine book / magazine wall display changed the feel of the room instantly.
This DIY is so easy that I am going to keep the 'how to' very short. Take your favourite twine or ribbon, maybe even think of the colours of the room, the magazines or books and cut the ribbon to desired length.
As you can see above I used varying lengths and the same length on the left. I felt that for books of the same size a varying length is best while for magazines the same length of ribbon looked perfect. Take the chosen concrete pendants as weight and stop for the book / magazine and thread it up. Make a knot with the twine ends, tadahh!

Just a quick note in regards to the wall hook/s to use. Well, I used concrete wall hooks, which I made myself of course since I wanted something of an artistic statement, but a silver, black or copper nail will provide an even simpler look. Picture pins will also do the trick, especially if you are using the holder to display, your notebooks and journals, Christmas cards or photographs.
Mmh... what else, nope, I think that's it. The only open question on my mind is, where are you going to hang yours?!.
Antje
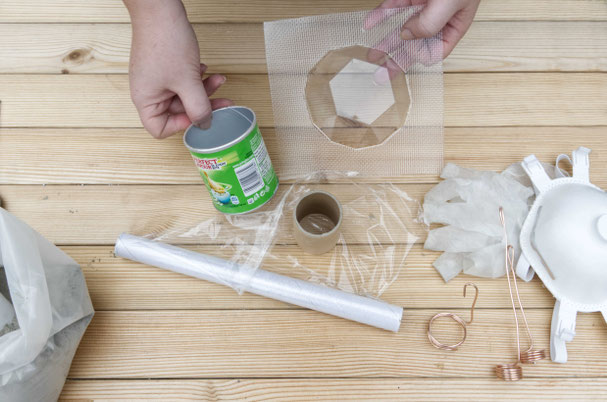
Concrete Copper Wire Air Plant Holder Diy With Recycled, Plastic & Cling Film Moulds

It is about time, I know time goes by way too fast but at long last I put together my first proper concrete diy instructions for you guys!
Since you love Air Plants as much as I do, I thought it would be good to start with a concrete diy which combines the love for concrete, copper and Air Plants which can be decorated all year around. Not to worry I got more diy's coming up for the holiday season, yeah, already excited to share those with you soon too!
As the picture suggests, I have prepared instructions for you to not just create one style but three. So you will be able to create totally different styles for your table scape or indoor-garden, keeping individuality at its best!
We will use recycled moulds, my new geometric plastic reusable mould and something from the kitchen, cling film to create a unique 'tree bark' texture in any mould you fancy!
To start things, check the material list below. Once you have gathered all your materials you will need to calculate about 1 to 2 hours for the wire bending, mixing and pouring. After about 3 hours spare time it will be about half an hour for unwrapping and sanding.
Materials from building depot, craft shop and your kitchen:
gloves, mask and glasses;
recycled mould, cling film, my plastic mould [also made
from recycled material];
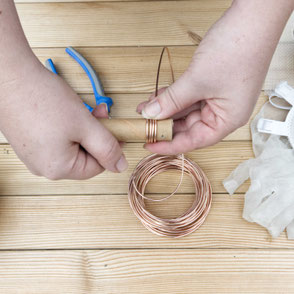
3mm wire in your preferred colour;
a quick set concrete pre mix;
water and mixing tools [spoon & bowl];
Air Plants or alternative decoration
Bending the copper coloured aluminium wire into Air Plant holder spirals
Concrete is weak ... without its reinforcement

Similarly to stone concrete has a very high compressive strength while not performing to well under tension. During the 1850s European engineers tackled this problem by inserting steel bars into the concrete.
The solution – reinforced concrete – was born and is now more common than concrete on its own. The reinforcement used is mainly steel in the form of bars and meshes and structural fibres made of various materials.
The facts have been curated by Guest Blogger Heidi.
Enjoy! We looking forward to your comments and your next visit.
X
Strength and Structure Test
About two weeks ago I was asked by a lovely client to create an extra large concrete diamond set.
Today I am doing a strength and structure, stability and quality test - well I throw it around! Why?
Due to the size the concrete diamonds would become too heavy. They are supposed to be display/show objects and should offer the option to be easily carried.
My solution is a custom styrofoam core which than is covered by concrete. However as the concrete is now only the shell I needed to test it to ensure it is stable. Okay you got me - anything to
throw a bit of concrete around.
Allow me to provide you with some facts.
|| size: 200mm/8inch tall, max width 250mm/10inch
|| this concrete sculpture is 2.5 weeks young
|| finish and structure: concrete, foam core, reinforcement; some crazing [crazing is a network of fine barely visible surface cracks]
Thrown 3 times and I am 1.80m tall.
Damage
The tip did break but was still in place due to the fibers. However you could take it apart. One pointy side showed the same signs.
Success!!
It did not break. These are not natural forces which the sculpture should withhold but it is always good to know that it would and that the structure is sound.
Summary
With proper care the concrete diamond sculptures should be fine for a long time.
!!!! DON'T DO IT AT HOME || If you must - always wear safety glasses and proper boots !!!!!
Thanks for stopping by - I look forward to your comments!
All the best,
PASiNGA
Winter Care For Your Concrete Art Works
Proper maintenance is necessary to protect your concrete art from the freeze-thaw cycles that occur in the winter. Any piece that can hold water, snow, or ice
[this includes planters and statuary and not just birdbaths and fountains] can be damaged.
Here are some tips on how to minimize possible winter damage.
If a planter is left planted over the winter, raise it up off the ground.
If a planter is going to be empty over the winter it is a good idea to store it in the garage, shed, or porch away from the elements.
If a planter cannot be moved into a garage or shed; empty it and turn the planter upside down. Place the planter onto wood strips, cover or wrap with burlap or any absorbent material, and finally cover it with dark plastic. This will prevent moisture from getting into the planter.
Tender Loving Care || for your concrete art

Thanks for stopping bye!
x