The Brief
Mid-June this year I was asked to work with the amazing team of photographer David Newton and stylist Bettina Vetter for an artistic yet marketing related feature in the Wylde Magazine. The idea was to embed objects within a geometric concrete solid.
However, the concrete solid was meant to be in so far breakable as to allow the team to break it purposefully to free the object inside, step by step. This ambitious task was very experimental
and the execution by shape, material and the combination of both unexplored. But as crazy as this idea sounded, crafting something just to be destroyed, as intriguing it was.
How We Did It
First a shape had to be found. From simple prism geometries to complex 3D forms, from using different shapes for each object to embed them all in one. The trigonal dodecahedron paper weight design made the cut for jewellery inspired reasons of the object as well as due to its triangular sides in contrast to the rectangular sides of the objects.
But where should the object be placed and what would be the ideal finish for the concrete? I can only imagine the endless thoughts Bettina as the stylist must have had or David about the image/s he wanted to take. The agreement was found, a smooth pale concrete finish and the objects should be embedded on different sides.
Now it was my turn to deliver. I started with a simulation to find the right proportions and to get an idea of the volume of the solid.

My first thought was to simply water concrete down to make it easily breakable but due to the shape and size a strong mix was required in order to keep the corners and edges alive. Re-enforcement would have been an unwanted obstacle during the “breaking” process therefore this was not an option to strengthen the concrete solid.
About 15 sample mixtures later I found a promising mix and the pouring could commence. Several tricks had to be employed to place each object as close as possible at its intended location and adjustments had to be made to the mixture to pour the second solid. Each had about 3 days to cure within the mould and only the first one was in need to be sanded by hand.


As you can see I did enjoy myself and I hope you enjoyed the post as well. Thanks for stopping by and a lovely day,
Antje
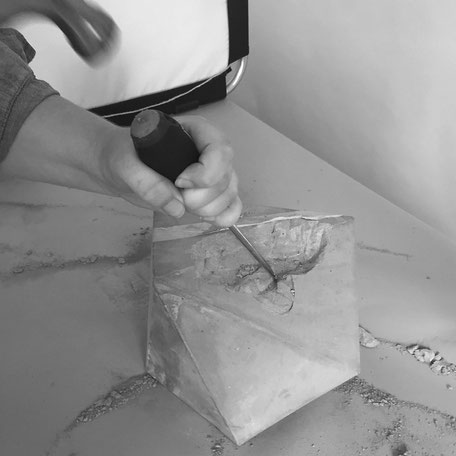
The day of the shoot came and the team worked closely together to achieve the intended outcome. Although it was hard work simple tools have been sufficient to destroy, well purposefully open, the concrete solids. Every slap with the hammer was a dare, exploring the concrete, anxiously hoping and finally the thrilling moment of finding the object again.
The concrete part of the process took about a month. However, the crowning moment will be the feature of the artistic collaboration in the September issue of the Wylde Magazine.


Write a comment
Rob (Tuesday, 06 September 2016 17:28)
Cool idea.
I might have tried two mixes like you were making marble bread. One regular, one with excess sand or filler like hypertufa without the moss. Then you could create weak points.